Showing posts with label Twilio. Show all posts

Handle Twilio SMS Status Call back in Azure Logic apps

In my previous post, I explained how to send SMS using Twilio connector in Azure logic app. In this post, I will describe how to capture the Twilio SMS Status call back events after we sent the SMS using Twilio and save them to the database using logic app . 

Prerequisites:

  • Azure subscription
  • A sender application to send SMS using Twilio

Steps:

1) Login to Azure portal

2) Select "Create a Resource" -> Search for Logic app -> Create

3) Select subscription, resource group, Region and give logic app name -> Click on Review & Create button -> Create

4) Open the logic app once the deployment completed

5) Select Http Request response template in the Logic Apps Designer. It will create a new app with Request and Response connectors.

6) I want to capture the SMS status back to the SQL server using SQL connector. Insert new step(+ icon) after Http Trigger connector -> Add an Action -> In the search box, enter "Sql" to filter the connectors -> Select "Sql Serve" -> Under the actions list select the "Insert row (V2)"

7) Create the connection by giving the required details 

8) Once you created the connection, select the Server name, Database name, table name. Once you          selected the table name, it will show the required columns name automatically in the form. If you want other columns, you can open the "Add New Parameter" drop down and select the required columns. 


9) Here I want to capture the MessageId (Unique message Id in our system), MessageSid (Sid from Twilio), MessageStatus (Status from Twilio) from the call back data. As I am sending the MessageId as query string parameter to the call back page, I am capturing it's value by using the expression 

 @triggerOutputs()['queries']['Id']

The main thing here is Twilio will post the data to our call back end point in application/x-www-form-urlencoded format. So I used the below expression to get the parameters posted by Twilio. We can red the form data posted to our logic app with the below expression

triggerFormDataValue('MessageSid')

triggerFormDataValue('MessageStatus')

10) In the Response connector, just send the 200 status code back to Twilio.


11) Save the logic app. Once you saved the logic app it will generate an URL in the HTTP trigger connector.

https://prod-13.eastus.logic.azure.com:443/workflows/5689fd744182e381f19a1a7ed4ee58cf/triggers/manual/paths/invoke?api-version=2016-10-01&sp=%2Ftriggers%2Fmanual%2Frun&sv=1.0&sig=ZrrSXg_0ZY5_hXz_yft0BPYiyXdWKK8g-ji7Ldm1Hb8

12) Use this URL as Status call back urn while sending the Twilio SMS along with the query string value id. Below is how I used in the logic app created in my previous post.


 That's it. Now your logic app will receive the status call backs and save the response in the database.

Happy Coding 😀!

Azure Logic Apps - Sending SMS using Twilio connector

 Azure logic apps is a cloud service that helps you to define your works flows, schedule tasks etc in the cloud. It is server less and fully managed IPAAS (Integration Platform as Service) with inbuilt scalability. 

Logic apps provides a visual designer for create and configure your work flows. You can define your work flow with in-built connectors or other enterprise connectors. 

Advantages of Logic app

  • Inbuilt Connectors: We have plenty of inbuilt connectors, triggers and actions that cover many of the common business scenarios. 
  • Templates: Logic apps comes with many predefined templates that are available for common business cases which reduces the  development work.
  • Integration: You can integrate your on-premise legacy systems with the new ones in the cloud. 
  • Extensibility: You can create your own custom APIs, Azure Functions and integrate them to the workflow, if the inbuilt connectors are not met your needs.
  • Minimal Development Effort:  We can create the logic apps with minimal development effort in browser or visual studio.

Logic app for sending an SMS

Azure logic apps offers a pre-built Twilio connector which can allow you to send, get or list SMS / MMS from your Twilio account. In this post I will demonstrate how to use the logic app to Send an SMS using Twilio connector.

Prerequisites:

  • Azure subscription
  • Twilio AccountId and Authentication token
  • A Twilio number / Twilio verified number to send SMS
Steps:
1) Login to Azure portal
2) Select "Create a Resource" -> Search for Logic app -> Create
3) Select subscription, resource group, Region and give logic app name -> Click on Review & Create button -> Create
4) Open the logic app once the deployment completed
5) Select Http Request response template in the Logic Apps Designer. It will create a new app with Request and Response connectors as below


6) I want to send the SMS request in the following format
{
    "sendingNumber": "xxxxxxxxx",
    "destinationNumber": "xxxxxxxxx",
    "messageContent": "message from logic app",
    "statusCallBackURL": "https://hookb.in/yDRKx6el2xFJNNPaR2kk"
}
So, in the Http request trigger, give the following as request body JSON schema
{
    "type": "object",
    "properties": {
        "sendingNumber": {
            "type": "string"
        },
        "destinationNumber": {
            "type": "string"
        },
        "messageContent": {
            "type": "string"
        },
        "statusCallBackURL": {
            "type": "string"
        }
    }
}


7) Click on Insert new step(+ icon) after Http Trigger connector -> Add an Action -> In the search box, enter "twilio" to filter the connectors -> Under the actions list select the action you want. I selected Send Text Message (SMS) as we are going to send a message.


8) Now provide the necessary details for your connection like Connection name, Twilio Account Id, Twilio Access Token and select Create button


9) Give the necessary details for sending the SMS like From Phone Number, To Phone Number, Text, Status Call back (You can get this parameter by selecting it from "Add New Parameter" dropdown). You can pick these values from logic app Trigger.


10) It completes the message sending. But I want to send the message SID back to the user in response. So I modified the Response connector as below


11) Save the logic app. Once you saved the logic app it will generate an URL in the HTTP trigger connector.  Now you can trigger your logic app by posting your request to that URL.

I will explain the logic app for handling the Twilio SMS status call back in another post. 

Happy Coding 😀!

Angular 6: Voice Calls using Twilio Javascirpt Client

Following process will explain how to implement the Web based calls using Twilio in an Angular application with .NET Core. For implementing a browser based call, we need to implement the following
  • Create an API which returns the TwiML.
  • Create a TwiML Client App in Twilio
  • Create an APIUto return the capability token
  • Configure the Twilio Javascript SDK in Anguar application

Create an API which returns the TwiML

We need to create an api method which return handle the request sent from the TwiML app and initiates the call using Dial Verb as follows
var response = new VoiceResponse();
var dial = new Dial(callerId: fromNumber
 , action: actionUrl
 , method: Twilio.Http.HttpMethod.Post
 , timeout: 60);
dial.Number(phoneNumber: To);
response.Append(dial);
return response.ToString();
Here, we specified the from number, actionUrl, actionUrl method and timeout for the dial verb. The to number should be in the Number attribute under dial verb. If you want to use call recording, then the above code will be as 
var response = new VoiceResponse();
var dial = new Dial(callerId: fromNumber
 , action: actionUrl
 , method: Twilio.Http.HttpMethod.Post
 , timeout: 60
 , record: RecordEnum.RecordFromRinging);
dial.Number(phoneNumber: To
 , url: recordingUrl
 , method: Twilio.Http.HttpMethod.Post);
response.Append(dial);
return response.ToString();
once the API created, we need to host it in a public URL to call it from TwiML app. (Or else you can use the advantage of Twilio Function to create your TwiML app)

Create a TwiML Client App in Twilio

For creating a TwiML app,
Login to Twilio 
-> Navigate to Programmable Voice 
-> TwiML 
-> TwiML Apps 
-> Click on Create TwiML app button ( or the plus symbol).

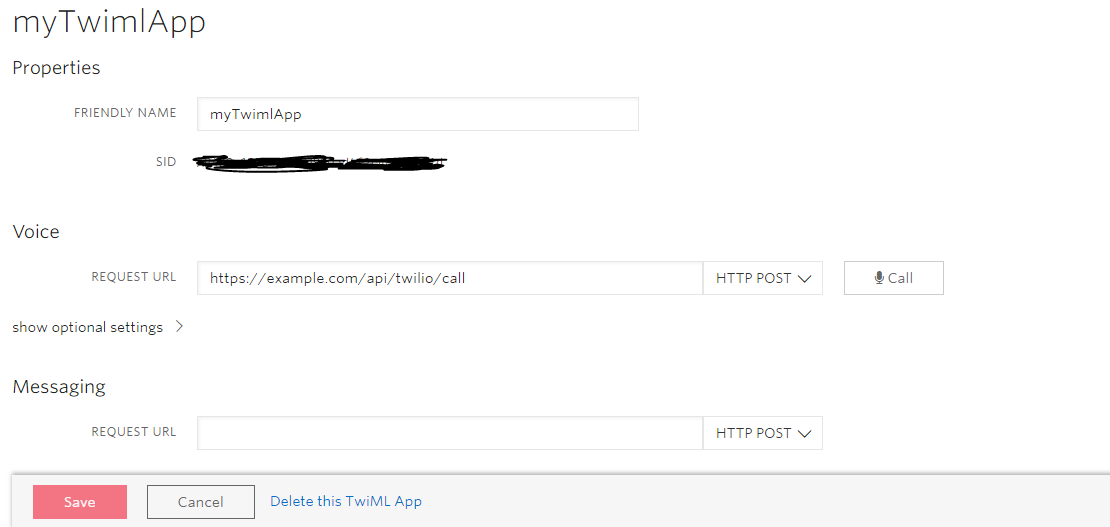
Give the Friendly name for the TwiML app and Voice Request URL (the one we created in the above step) and click on Create button.


Now if you open the app you created, it will show the SID for the TwiML app.


Create an API to return the capability token

Once we created the TwiML app, we need to write an API to generate the capability token for Twilio Javascirpt library. Following is the API code to generate the capability token.
// Put your Twilio API credentials here
const string accountSid = "ACexxxxxxxxxxxxxxxxxxxxxxxxxxxxxxx";
const string authToken = "95xxxxxxxxxxxxxxxxxxxxxxxxxxxxxx";

// Put your TwiML App Id here
const string appSid = "APxxxxxxxxxxxxxxxxxxxxxxxxxxxxxxxx";

var scopes = new HashSet<IScope>
{
 new OutgoingClientScope(appSid)
};
var capability = new ClientCapability(accountSid, authToken, scopes: scopes);

return capability.ToJwt();
Following is the complete code of my API methods  created in Steps 1 and 3
using Microsoft.AspNetCore.Cors;
using Microsoft.AspNetCore.Mvc;
using System;
using System.Collections.Generic;
using Twilio.Jwt;
using Twilio.Jwt.Client;
using Twilio.TwiML;
using Twilio.TwiML.Voice;
using static Twilio.TwiML.Voice.Dial;

namespace Twilio.API.Controllers
{
    [Route("api/[controller]")]
    [EnableCors("CorsPolicy")]
    [ApiController]
    public class TwilioController : ControllerBase
    {
        // GET api/twilio/token
        [HttpGet("token")]
        public string GetToken()
        {
            // Put your Twilio API credentials here
            const string accountSid = "ACexxxxxxxxxxxxxxxxxxxxxxxxxxxxxxx";
const string authToken = "95xxxxxxxxxxxxxxxxxxxxxxxxxxxxxx";
// Put your Twilio Application SID here const string appSid = "APxxxxxxxxxxxxxxxxxxxxxxxxxxxxxxxx";
var scopes = new HashSet<IScope> { new OutgoingClientScope(appSid) }; var capability = new ClientCapability(accountSid, authToken, scopes: scopes); return capability.ToJwt(); } // POST api/twilio/call [HttpPost("call")] public string StartCall(string To, bool IsRecord) { string fromNumber = "xxx-xxx-xxx"; var actionUrl = new Uri("http://localhost/api/statuscallback"); // Here I am giving the sample url, but it should be a public url to allow Twilio to post data var response = new VoiceResponse(); var dial = new Dial(callerId: fromNumber , action: actionUrl , method: Twilio.Http.HttpMethod.Post , timeout: 60, record: RecordEnum.RecordFromRinging); // If recording required if (IsRecord) { dial.Record = RecordEnum.RecordFromRinging; var recordingUrl = new Uri("http://localhost/api/record"); // Here I am giving the sample url, but it should be a public url to allow Twilio to post data dial.Number(phoneNumber: To , url: recordingUrl , method: Twilio.Http.HttpMethod.Post); } else dial.Number(phoneNumber: To); response.Append(dial); return response.ToString(); } } }

Configure the Twilio Javascript SDK in Anguar application

a) Add twilio client sdk in the header section of the index.html file .You can find the latest version from here
<script type="text/javascript" src="//media.twiliocdn.com/sdk/js/client/v1.7/twilio.min.js"></script>
b) In the component typescirpt file where you want to use Twilio add the below line under imports.
 declare const Twilio: any;
 
c) In the ngOnInit method, call the token api and initiate the Twilio
 ngOnInit() {
    
    this.http.get('https://localhost:44346/api/twilio/token',  { responseType: 'text'}).subscribe((data)=>
    {
        Twilio.Device.setup(data);
    });
    
  }
d) Add call button in the UI
 Phone number: <input type="text" placeholder="Enter Phone number" [(ngModel)]="phoneNumber"/>
 <button (click)="Phonecall()">Call</button>
e) Add the belwo Phone call method in the typescript file
Phonecall()
{
  if(this.connection==null)
  {
 console.log('connection is null. Initiating the call');
 var params = { "To": this.phoneNumber, "IsRecord":true};
 this.connection = Twilio.Device.connect(params);
  }
  else {
 this.connection = null;
 Twilio.Device.disconnectAll();
  }
}

Happy Coding  😊!!

Reference:
1) Twilio Client Javascript Quickstart
2) Twiml