
API Gateway supports multiple mechanisms for controlling and managing access to your API. You can find those here. Usage Plans is one of the mechanism which allows you to provide API keys to your customers — and then track and limit usage of your API stages and methods for each API key
In this post, you will learn how to use API keys for authenticating the methods in the API gateway.
To set up API keys for API gateway we need to do the following steps


In this post, you will learn how to use API keys for authenticating the methods in the API gateway.
To set up API keys for API gateway we need to do the following steps
1) Create an API gateway with desired API methods
I am not going to explain this in this tutorial as it is out of the scope. You can learn how to create methods in API gateway from here
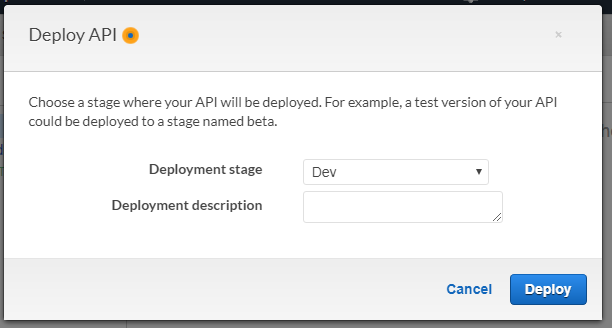
2) Deploy the API to a stage
- In the API Gateway main navigation pane, choose "Resources".
- From the "Actions" drop-down menu, choose "Deploy API".
- In the "Deploy API", select an existing "Deployment Stage" or create new Stage
- Click on "Deploy"
- It will deploy your api and give the api url
3) Create an API key(s) for the API
- In the API Gateway main navigation pane, choose "API Keys".
- From the "Actions" drop-down menu, choose "Create API key".
- In "Create API key",
- Type an API key name in the Name input field.
- Choose Auto Generate to have API Gateway generate the key value, or choose Custom to enter the key manually.
- Enter description if you want
- Choose Save
- Repeat this step if you want to add more keys
- It will create new key and will show as following. You can view the key by clicking on show button

4) Create a new usage plan
Create a new usage plan. Add the deployed API stage to the usage plan. Attach an API key to the usage plan or choose an existing API key in the plan. Note the chosen API key value.
- In the API Gateway main navigation pane, choose "Usage Plans".
- Click on "Create" button
- In "Create Usage Plan",
- Type name of the usage plan
- Enable Throttling, Quota if required (I disabled those in my case)
- Click on Next
- In the next screen, click on "Add API Stage"
- Select your API -> Stage -> Click on checkmark
- Click on Next
- In the next screen, "Create API Key and add to Usage Plan" if you want to add new api key or click on "Add API Key to Usage Plan" to add existing API key. Here I am selecting existing one
- Enter the name of the api key (created in Step 3) and click on checkmark. Repeat this if you want to attach another key to this Usage Plan
- Click on "Done"
5) Configure API methods to require an API key
- In the API Gateway main navigation pane, choose "Resources".
- Under "Resources", choose an existing method.
- Choose "Method Request".
- Under the "Authorization Settings" section, choose true for "API Key Required".
- Save the settings by clicking on checkmark icon.
6) Redeploy the API
Redeploy the API to the same stage (Check Step 2 for deployment process)
The client can now call the API methods while supplying the x-api-key header with the chosen API key as the header value.
Happy Coding 😊!
Happy Coding 😊!