Showing posts with label Angular. Show all posts

Angular Directives - Numbers only Directive

 Angular Directives

In Angular, Directives are custom HTML attributes which tell Angular compiler to change the style or behavior of the elements. These are basically classes, that add additional behavior to elements in your Angular applications.

We have 3 different types of Directives in Angular

  1. Component Directives: These are directives with a template. General components 
  2. Attribute Directives: These will change the appearance and behavior of the elements. Built in Attribute directives are NgClass, NgStyle, NgModel etc.
  3. Structural Directives: These will change the DOM layout by adding or removing DOM elements. Built in Attribute directives are NgIf, NgFor, NgSwitch etc.

You can read more about directives here.

Creating Numbers only Directive

In this post, I am going to explain how to create an attribute Directive which will allow only numbers from the user for an input box.

1) Create a directives by using below command  
ng generate directive numbersOnly
which generates 
1) A directive file src/app/numbers-only.directive.ts
2) A test file for the above directive src/app/numbers-only.directive.spec.ts
3) Declare the class in app.module.ts
with the below content

src/app/numbers-only.directive.ts
import { Directive } from '@angular/core';

@Directive({
  selector: '[appNumbersOnly]'
})
export class NumbersOnlyDirective {

  constructor() { }

}
app.module.ts
import { BrowserModule } from '@angular/platform-browser';
import { NgModule } from '@angular/core';

import { AppRoutingModule } from './app-routing.module';
import { AppComponent } from './app.component';
import { NumbersOnlyDirective } from './numbers-only.directive';

@NgModule({
  declarations: [
    AppComponent,
    NumbersOnlyDirective
  ],
  imports: [
    BrowserModule,
    AppRoutingModule
  ],
  providers: [],
  bootstrap: [AppComponent]
})
export class AppModule { }
2) Now add ElementRef in the directive's constructor() to inject a reference to the host DOM element, the element to which you apply appNumbersOnly
import { Directive, ElementRef } from '@angular/core';

@Directive({
  selector: '[appNumbersOnly]'
})
export class NumbersOnlyDirective {

  inputElement: HTMLElement;

  constructor(public el: ElementRef) {
    this.inputElement = el.nativeElement;
  }
}
3) Now for implementing the numbers only we need to handle in 3 ways
a) When user enters a key
b) When user paste some value
c) When user drop some value
  @HostListener('keydown', ['$event'])
  onKeyDown(e: KeyboardEvent) {
    
    // Ensure that it is a number and stop the keypress
    if (!isNaN(+e.key)) {
      return;
    }
    else {
      e.preventDefault();
    }
  }

  @HostListener('paste', ['$event'])
  onPaste(event:any) {
    event.preventDefault();
    const pastedInput: string = event.clipboardData
      .getData('text/plain')
      .replace(/[^0-9-]+/ig, ''); // get a digit-only string
    document.execCommand('insertText', false, pastedInput);
  }

  @HostListener('drop', ['$event'])
  onDrop(event: DragEvent) {
    event.preventDefault();
    const textData =  event.dataTransfer?.getData('text').replace(/[^0-9-]+/ig, '');
    this.inputElement.focus();
    document.execCommand('insertText', false, textData);
  }
Here the in the keydown event I am checking whether e.Key is number or not. 
Note: e.KeyCode,e.which are deprecated and not supported from Angular 8 version. Read more here.

4) Now our directive will accept only numbers. Here our keydown event accept only if the given key is number. But we need to allow some other keys as well like Backspace, Delete, Tab etc. So add exceptions for those as well.
 private navigationKeys = [
    'Backspace',
    'Delete',
    'Tab',
    'Escape',
    'Enter',
    'Home',
    'End',
    'ArrowLeft',
    'ArrowRight',
    'Clear',
    'Copy',
    'Paste'
  ];
@HostListener('keydown', ['$event'])
  onKeyDown(e: KeyboardEvent) {
    if (
      this.navigationKeys.indexOf(e.key) > -1 || // Allow: navigation keys: backspace, delete, arrows etc.
      (e.key === 'a' && e.ctrlKey === true) || // Allow: Ctrl+A
      (e.key === 'c' && e.ctrlKey === true) || // Allow: Ctrl+C
      (e.key === 'v' && e.ctrlKey === true) || // Allow: Ctrl+V
      (e.key === 'x' && e.ctrlKey === true) || // Allow: Ctrl+X
      (e.key === 'a' && e.metaKey === true) || // Allow: Cmd+A (Mac)
      (e.key === 'c' && e.metaKey === true) || // Allow: Cmd+C (Mac)
      (e.key === 'v' && e.metaKey === true) || // Allow: Cmd+V (Mac)
      (e.key === 'x' && e.metaKey === true) // Allow: Cmd+X (Mac)
    ) {
      // let it happen, don't do anything
      return;
    }
    
    // Ensure that it is a number and stop the keypress
    if (!isNaN(+e.key)) {
      return;
    }
    else {
      e.preventDefault();
    }
  }
  
  
Here is the final version of our Directive.
 import { Directive, ElementRef, HostListener } from '@angular/core';

@Directive({
  selector: '[appNumbersOnly]'
})
export class NumbersOnlyDirective {
  private navigationKeys = [
    'Backspace',
    'Delete',
    'Tab',
    'Escape',
    'Enter',
    'Home',
    'End',
    'ArrowLeft',
    'ArrowRight',
    'Clear',
    'Copy',
    'Paste'
  ];

  inputElement: HTMLElement;

  constructor(public el: ElementRef) {
    this.inputElement = el.nativeElement;
  }

  @HostListener('keydown', ['$event'])
  onKeyDown(e: KeyboardEvent) {
    if (
      this.navigationKeys.indexOf(e.key) > -1 || // Allow: navigation keys: backspace, delete, arrows etc.
      (e.key === 'a' && e.ctrlKey === true) || // Allow: Ctrl+A
      (e.key === 'c' && e.ctrlKey === true) || // Allow: Ctrl+C
      (e.key === 'v' && e.ctrlKey === true) || // Allow: Ctrl+V
      (e.key === 'x' && e.ctrlKey === true) || // Allow: Ctrl+X
      (e.key === 'a' && e.metaKey === true) || // Allow: Cmd+A (Mac)
      (e.key === 'c' && e.metaKey === true) || // Allow: Cmd+C (Mac)
      (e.key === 'v' && e.metaKey === true) || // Allow: Cmd+V (Mac)
      (e.key === 'x' && e.metaKey === true) // Allow: Cmd+X (Mac)
    ) {
      // let it happen, don't do anything
      return;
    }
    
    // Ensure that it is a number and stop the keypress
    if (!isNaN(+e.key)) {
      return;
    }
    else {
      e.preventDefault();
    }
  }

  @HostListener('paste', ['$event'])
  onPaste(event:any) {
    event.preventDefault();
    const pastedInput: string = event.clipboardData
      .getData('text/plain')
      .replace(/[^0-9-]+/ig, ''); // get a digit-only string
    document.execCommand('insertText', false, pastedInput);
  }

  @HostListener('drop', ['$event'])
  onDrop(event: DragEvent) {
    event.preventDefault();
    const textData =  event.dataTransfer?.getData('text').replace(/[^0-9-]+/ig, '');
    this.inputElement.focus();
    document.execCommand('insertText', false, textData);
  }
  
}
 

Applying our custom attribute directive

To use the NumbersOnlyDirective, add an <input> element to the HTML template with the directive as an attribute.
 Enter number:

Creating Custom Elements using Angular

Custom Elements is one of the key features of the Web platform. Custom Elements extend HTML by allowing you to define a tag whose content is created and controlled by JavaScript code. The idea is that you can use something like <app-chat-form></app-chat-form> along with the standard elements like <h1>,<input> etc. This feature currently supported by Chrome, Edge (Chromium-based), Firefox, Opera, and Safari, and available in other browsers through polyfills. You can learn more about custom elements here and here.

Angular Elements allow us to expose our components as reusable elements. We can use the Angular elements in other angular applications or non-angular applications such as HTML, React, PHP, WordPress etc. as well. In general Angular Elements are Angular Components packaged as custom elements. @angular/elements package exports a createCustomElement() API that provides a bridge from Angular's component interface and change detection functionality to the built-in DOM API. It automatically converts your component to equivalent native HTML elements.

Following are the Step by Step process for creating custom elements with Angular. Here I am creating a simple contact form.

1) Create an Angular project

Create an Angular project in CLI using below command
  ng new angular-chat-form --routing=false --skip-tests=true --style=css
I am not using the routing and tests for my project and using css for styling

2) Create a chat component

Lets create an angular component which will turn as embeddable web component later.
ng generate component chat-form
or 
ng g c chat-form
This will generate the typescript, html template and css files for the component and below are the code blocks in each file. You can add your own design and code here.

chat-form.component.html
{{title}}
Name is required
Email is required

chat-form.component.css
* {box-sizing: border-box;}

/* Button used to open the contact form - fixed at the bottom of the page */
.open-button {
  cursor: pointer;
  position: fixed;
  bottom: 0px;
  right: 28px;
  width: 280px;
}

/* The popup form - hidden by default */
.form-popup {
  position: fixed;
  bottom: 0;
  right: 15px;
  z-index: 9;
  width: 400px;
}

chat-form.component.ts
import { Component, Input, OnInit } from '@angular/core';
import { NgForm } from '@angular/forms';

@Component({
  selector: 'app-chat-form',
  templateUrl: './chat-form.component.html',
  styleUrls: ['./chat-form.component.css']
})
export class ChatFormComponent implements OnInit {

  @Input() id: number = -1;
  @Input() title: string = "Sign Up! for News Letter";
  @Input() buttonTitle: string = "Subscribe for News Letter";
  formOpen = false;
  formData = { name: '', email: '' };
  formSubmitted = false;

  constructor() { }

  ngOnInit() {

  }
  openForm() {
    this.formData = { name: '', email: '' };
    this.formSubmitted = false;
    this.formOpen = true;
  }
  onSubmit(form: NgForm) {
    this.formSubmitted = true;
    if (!form.valid)
      return;
  }
  closeForm() {
    this.formOpen = false;
  }
}
Now my component is ready. Here I used bootstrap for the design in my application. 

3) Add the Angular Elements package

We need to get the @angular/elements library, so we run
ng add @angular/elements 
This will bring the library inside our node_modules folder. It also adds the document-register-element.js polyfill required for web browsers that don't support custom elements yet and the @angular/elements package.

Now we need to tell Angular, not to treat our component as common Angular component. We can do in it in the module bootstrapping level. For this, we need to implement ngDoBootstrap method in our AppModule and tell our module to define a custom element by using the createCustomElement function in @angular/elements package. Below is how my app.module.ts looks like after these changes (Removed the AppComponent). 

app.module.ts
import { BrowserModule } from '@angular/platform-browser';
import { DoBootstrap, Injector, NgModule } from '@angular/core';

import { ChatFormComponent } from './chat-form/chat-form.component';
import { FormsModule } from '@angular/forms';
import { createCustomElement } from '@angular/elements';

@NgModule({
  declarations: [
    ChatFormComponent,
  ],
  imports: [
    BrowserModule,
    FormsModule
  ],
  providers: [],
  entryComponents: [ChatFormComponent]
})
export class AppModule implements DoBootstrap {
  constructor(private injector: Injector) {
    const customElement = createCustomElement(ChatFormComponent, { injector });
    customElements.define('app-chat-form', customElement);
  }

  ngDoBootstrap() {

  }
} 
Here,
  1. Add ChatFormComponent inside entryComponents array property of NgModule and remove the AppComponent
  2. We need to pass the injector to our component manually to ensure dependency injection works at runtime.
  3. We put our component in entryComponents list for bootstrapping the web component.  
  4. createCustomElement turns our component to web component. We provide the output of this function to customElements.define function.
  5. customElements.define tells how our component can be called from other HTML pages. We can override our Angular component selector here. In this case, I used the same name but we can use any two or more words separated with hyphen (as per Custom Elements API, name should contains at least one hyphen. Check here for more details. 
    customElements.define('chat-form', customElement);
    
  6. Finally we are using ngDoBootstrap() to manually bootstrap the app module.


4) Build the application

Our next step is to build the application. 
ng build
At this point, we can find the following files in dist folder.


You will not get the vendor.js file if you build for prod as below.
ng build --prod --output-hashing=none
in this case, your dist folder will look like below


5) Using the custom element in HTML page

We need to include these files in app where we need to use our custom element as below.


	AngChatForm


Angular Elements demo

Note: 
  1. We need to add bootstrap CDN as we used bootstrap npm
  2. The input elements naming pattern is different for custom elements. When we use Camel case (buttonTitle) in our Angular element input variable, then we need to use Kebab case (button-title)

It will work as below

Chrome


IE 11


Exporting the element as Single .js File

Generally, when we run the ng build or ng build -prod, it will create different files runtime, main, polyfills, vendor etc files in dist folder and we need to refer all these files in our target application. For convenience, we can bundle our Angular element as a single .js file using jscat npm. Install the jscat library as below.
npm install jscat
Modify the build command in package.json to build our app for prod mode. Make hashing off, so that we will get the files with standard names like main, polyfills etc.
Add another command called package, package2015 to concatenate all the required script files into 1 script file called ang-chat-button.js  file inside script section. 

Now my package.json scripts section will looks like as below
 "scripts": {
    "ng": "ng",
    "start": "ng serve",
    "build": "ng build --prod --output-hashing=none",
    "test": "ng test",
    "lint": "ng lint",
    "e2e": "ng e2e",
    "package": "jscat ./dist/ang-chat-form/runtime-es5.js ./dist/ang-chat-form/polyfills-es5.js ./dist/ang-chat-form/main-es5.js ./dist/ang-chat-form/vendor-es5.js > ./dist/ang-chat-button.js",
    "package2015": "jscat ./dist/ang-chat-form/runtime-es2015.js ./dist/ang-chat-form/polyfills-es2015.js ./dist/ang-chat-form/main-es2015.js ./dist/ang-chat-form/vendor-es2015.js > ./dist/ang-chat-button-es2015.js"
  }
Now just run the below command
 
npm run build && package
or (for ES6 support)
 
npm run build && package2015
It will build the application and create a file called ang-chat-button.js in "dist" folder.


Now you can use this one file in your target application along with the css files. The above html is now simplified as 


	AngChatForm


Angular Elements demo

You can find the code created for this post here.
Happy Coding 😀!


Angular: Get Comma separated string for one Property from an Array of Objects

This is a small useful snippet which will explain how to get a comma separated string for one property from an array of objects.

If following is your array of objects
var usersArray = [
    {
        id: "1",
        name: "Ram",
        active: true
    },
    {
        id: "2",
        name: "Jishith",
        active: false
    },
    {
        id: "3",
        name: "Anand",
        active: true
    },
    {
        id: "4",
        name: "Aayush",
        active: false
    }
];

To get the name as comma separated string, you just need to write as
var userNames = users.map(s => s.name).toString();
console.log(userNames);
The output will be
Ram,Jishith,Anand,Aayush

Suppose, if you want to get only active user list
var userNames = users.filter(s => s.active == true).map(s => s.name).toString();
console.log(userNames);
The output will be
Ram,Anand
If you want to filter with an array of values for an property, you have to use as below
var userIds=[2,3,4]
var userNames = users.filter(function (item) {
          return this.userIds.includes(item.id)
        }).map(s => s.name).toString(); 
console.log(userNames);
The output will be
Jishith,Anand,Aayush
Happy Coding 😊!

Angular 6: Voice Calls using Twilio Javascirpt Client

Following process will explain how to implement the Web based calls using Twilio in an Angular application with .NET Core. For implementing a browser based call, we need to implement the following
  • Create an API which returns the TwiML.
  • Create a TwiML Client App in Twilio
  • Create an APIUto return the capability token
  • Configure the Twilio Javascript SDK in Anguar application

Create an API which returns the TwiML

We need to create an api method which return handle the request sent from the TwiML app and initiates the call using Dial Verb as follows
var response = new VoiceResponse();
var dial = new Dial(callerId: fromNumber
 , action: actionUrl
 , method: Twilio.Http.HttpMethod.Post
 , timeout: 60);
dial.Number(phoneNumber: To);
response.Append(dial);
return response.ToString();
Here, we specified the from number, actionUrl, actionUrl method and timeout for the dial verb. The to number should be in the Number attribute under dial verb. If you want to use call recording, then the above code will be as 
var response = new VoiceResponse();
var dial = new Dial(callerId: fromNumber
 , action: actionUrl
 , method: Twilio.Http.HttpMethod.Post
 , timeout: 60
 , record: RecordEnum.RecordFromRinging);
dial.Number(phoneNumber: To
 , url: recordingUrl
 , method: Twilio.Http.HttpMethod.Post);
response.Append(dial);
return response.ToString();
once the API created, we need to host it in a public URL to call it from TwiML app. (Or else you can use the advantage of Twilio Function to create your TwiML app)

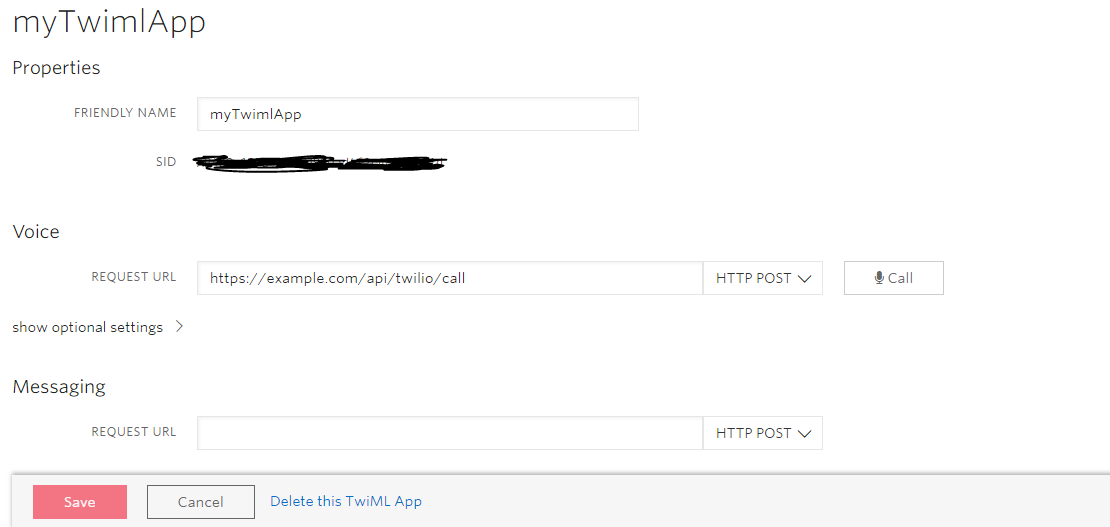
Create a TwiML Client App in Twilio

For creating a TwiML app,
Login to Twilio 
-> Navigate to Programmable Voice 
-> TwiML 
-> TwiML Apps 
-> Click on Create TwiML app button ( or the plus symbol).

Give the Friendly name for the TwiML app and Voice Request URL (the one we created in the above step) and click on Create button.


Now if you open the app you created, it will show the SID for the TwiML app.


Create an API to return the capability token

Once we created the TwiML app, we need to write an API to generate the capability token for Twilio Javascirpt library. Following is the API code to generate the capability token.
// Put your Twilio API credentials here
const string accountSid = "ACexxxxxxxxxxxxxxxxxxxxxxxxxxxxxxx";
const string authToken = "95xxxxxxxxxxxxxxxxxxxxxxxxxxxxxx";

// Put your TwiML App Id here
const string appSid = "APxxxxxxxxxxxxxxxxxxxxxxxxxxxxxxxx";

var scopes = new HashSet<IScope>
{
 new OutgoingClientScope(appSid)
};
var capability = new ClientCapability(accountSid, authToken, scopes: scopes);

return capability.ToJwt();
Following is the complete code of my API methods  created in Steps 1 and 3
using Microsoft.AspNetCore.Cors;
using Microsoft.AspNetCore.Mvc;
using System;
using System.Collections.Generic;
using Twilio.Jwt;
using Twilio.Jwt.Client;
using Twilio.TwiML;
using Twilio.TwiML.Voice;
using static Twilio.TwiML.Voice.Dial;

namespace Twilio.API.Controllers
{
    [Route("api/[controller]")]
    [EnableCors("CorsPolicy")]
    [ApiController]
    public class TwilioController : ControllerBase
    {
        // GET api/twilio/token
        [HttpGet("token")]
        public string GetToken()
        {
            // Put your Twilio API credentials here
            const string accountSid = "ACexxxxxxxxxxxxxxxxxxxxxxxxxxxxxxx";
const string authToken = "95xxxxxxxxxxxxxxxxxxxxxxxxxxxxxx";
// Put your Twilio Application SID here const string appSid = "APxxxxxxxxxxxxxxxxxxxxxxxxxxxxxxxx";
var scopes = new HashSet<IScope> { new OutgoingClientScope(appSid) }; var capability = new ClientCapability(accountSid, authToken, scopes: scopes); return capability.ToJwt(); } // POST api/twilio/call [HttpPost("call")] public string StartCall(string To, bool IsRecord) { string fromNumber = "xxx-xxx-xxx"; var actionUrl = new Uri("http://localhost/api/statuscallback"); // Here I am giving the sample url, but it should be a public url to allow Twilio to post data var response = new VoiceResponse(); var dial = new Dial(callerId: fromNumber , action: actionUrl , method: Twilio.Http.HttpMethod.Post , timeout: 60, record: RecordEnum.RecordFromRinging); // If recording required if (IsRecord) { dial.Record = RecordEnum.RecordFromRinging; var recordingUrl = new Uri("http://localhost/api/record"); // Here I am giving the sample url, but it should be a public url to allow Twilio to post data dial.Number(phoneNumber: To , url: recordingUrl , method: Twilio.Http.HttpMethod.Post); } else dial.Number(phoneNumber: To); response.Append(dial); return response.ToString(); } } }

Configure the Twilio Javascript SDK in Anguar application

a) Add twilio client sdk in the header section of the index.html file .You can find the latest version from here
<script type="text/javascript" src="//media.twiliocdn.com/sdk/js/client/v1.7/twilio.min.js"></script>
b) In the component typescirpt file where you want to use Twilio add the below line under imports.
 declare const Twilio: any;
 
c) In the ngOnInit method, call the token api and initiate the Twilio
 ngOnInit() {
    
    this.http.get('https://localhost:44346/api/twilio/token',  { responseType: 'text'}).subscribe((data)=>
    {
        Twilio.Device.setup(data);
    });
    
  }
d) Add call button in the UI
 Phone number: <input type="text" placeholder="Enter Phone number" [(ngModel)]="phoneNumber"/>
 <button (click)="Phonecall()">Call</button>
e) Add the belwo Phone call method in the typescript file
Phonecall()
{
  if(this.connection==null)
  {
 console.log('connection is null. Initiating the call');
 var params = { "To": this.phoneNumber, "IsRecord":true};
 this.connection = Twilio.Device.connect(params);
  }
  else {
 this.connection = null;
 Twilio.Device.disconnectAll();
  }
}

Happy Coding  😊!!

Reference:
1) Twilio Client Javascript Quickstart
2) Twiml

Hosting Angular application in IIS Server

We can host an angular application in IIS with the following simple steps.

Build the Angular application

 First build the Angular application using the following command
ng build
Once the build completes successfully it publishes all the build artifacts to the 'dist' folder.

Create a Web application in IIS

Create a Website or Web application and point it to the 'dist' folder in the Angular application.

Install URL Rewrite Module in the IIS

We should install the URL Rewrite Module in IIS, if it not installed already, to handle the deep-linking. We can do it by using Web Platform Installer or manually download and install from https://www.iis.net/downloads/microsoft/url-rewrite

Add web.config file with URL-rewrite rule

Add a web.config file to the root folder of the Angular application (where angular.json file exists) and add the following content
<?xml version="1.0" encoding="utf-8"?>
<configuration>
 <system.webServer>
  <rewrite>
    <rules>
      <rule name="Angular Routes" stopProcessing="true">
        <match url=".*" />
        <conditions logicalgrouping="MatchAll">
          <add input="{REQUEST_FILENAME}" matchType="IsFile" negate="true" />
          <add input="{REQUEST_FILENAME}" matchType="IsDirectory" negate="true" />
   </conditions>
         <action type="Rewrite" url="./index.html" />
      </rule>
     </rules>
   </rewrite>
 </system.webServer>
</configuration>
The above URL rewrite rule will route all the requests, which are not for files or folders, to the root of the application.
As the web.config needs to add in the build, add the following to the angular.json file under "assets" section to copy the web.config file to 'dist' folder when we build the application.
"assets": [
    "app/assets",
    "app/favicon.ico",
    "web.config"
],

Update Base Href value if required

We need to update the base href value in the index.html file based on our hosting type. If we host the application as a website, the base href value should be "/". If we hosted as a web application, the value should be "/<Your web application name>/". 
We can also change this value dynamically while building the application. For that, just use
ng build --base--href "/<Your web application name>/"

Build again

Now build it again to reflect the web.config changes and open the URL in the browser
Happy Coding 😊!!