Showing posts with label .NET Core. Show all posts

Deploying a .NET Core Lambda Project from the .NET Core CLI

In my previous post about "Creating a Lambda function in .NetCore with Visual Studio and AWS Visual Studio Toolkit  we learnt about how to create a lambda function in .net core and deploy it using Visual Studio Toolkit.

The deployment part can also be accomplished from command line using ".NET Core Global Tools for AWS". To install the .Net core global Lambda tools, use the following command in dotnet command line

dotnet tool install --global Amazon.Lambda.Tools --version 3.3.0

It will install the 3.3.0 (current version) of Lambda global tools. If you want to update the global tools you can use it as

dotnet tool update -g Amazon.Lambda.Tools

Deploy Lambda using Global Lambda Tools

Before going to deployment of lambda using Lambda global tools, first you need to understand about the "aws-lambda-tools-defaults.json" file. The file seems as below

{
  "Information": [
    "This file provides default values for the deployment wizard inside Visual Studio and the AWS Lambda commands added to the .NET Core CLI."
  ],

  "profile":"default",
  "region" : "us-east-1",
  "configuration": "Release",
  "framework": "netcoreapp2.1",
  "function-runtime": "dotnetcore2.1",
  "function-memory-size": 256,
  "function-timeout": 30,
  "function-handler": "Lambda::Lambda.Function::FunctionHandler",
  "function-name": "LambdaTest",
  "function-role": "arn:aws:iam::XXXXXXXXXXXX:role/service-role/lambda_basic_execution",
  "environment-variables" : "\"SourceQueue\"=\"source-queue\";\"TargetQueue\"=\"target-queue\";\"ErrorSns\"=\"my-error-sns\""
}
This file has a role for both manual and automated deployments. When you publish with AWS Visual Studio toolkit, the fields are pre-populated with the values from this file.When you use the command line interface, it will use the values specified in this file unless we override those in the command 

Following are some important settings

1) function-handler: This is how you tell AWS Lambda which method to invoke.  It is made up of 3 parts:

  a) Assembly / Namespace name (May be the same as the assembly name if your project isn't complex enough for a namespace heirarchy.)
  b) Class name along with Namespace
  c) Method name

2) function-name: Name of the lambda function in AWS
3) function-role: IAM role arn for executing Lambda.
4) environment-variables: Environment variables which needs to execute the lambda.

Once the settings are correctly placed, open the dotnet command line, navigate to the project folder and run the following command

Note: Your should install & configure the AWS CLI [https://aws.amazon.com/cli/] before running the below commands 

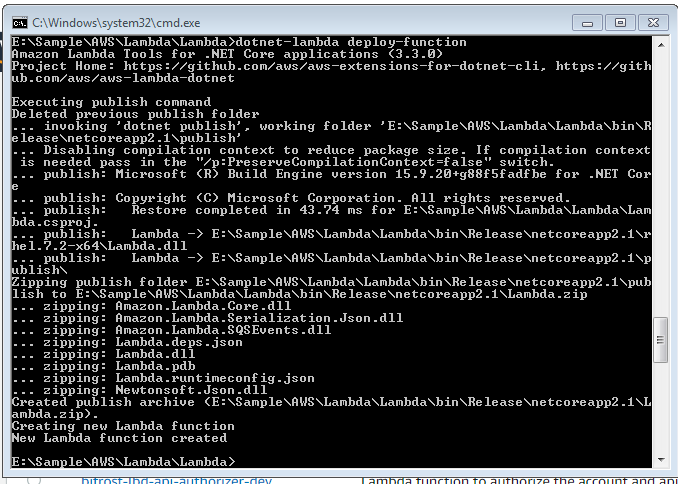
dotnet-lambda deploy-function 
Note: We can use either "dotnet-lambda" or "dotnet lambda"

It will deploy the lambda function to your account

Now you can found the lambda function created in your AWS account using AWS Console

The values are set automatically as we mentioned in the "aws-lambda-tools-defaults.json"


Overriding "aws-lambda-tools-defaults.json" settings

We can override the settings mentioned in "aws-lambda-tools-defaults.json" file while deploying the application by providing some extra parameters to the deploy-function command
The below command will create a function with "LambdaTest2" and 4 environment-variables
dotnet-lambda deploy-function -fn "LambdaTest2" -ev "SourceQueue=sourcequeue;TargetQueue=targetqueue;ErrorSns=myerrorsns;MiddleQueue=middlequeue"
It will create new function in the AWS with name "LambdaTest2" with 4 environment varaiables


You can check the remaining parameters accepted by deploy-function by using command
dotnet-lambda deploy-function --help

You can find more here.

Happy coding 😊!

Creating a Lambda function in .netCore with Visual Studio and AWS Visual Studio Toolkit

AWS allows .net Core framework also while creating Lambda functions. But the AWS console doesn't have any editor for .Net Core framework. It just has the option to upload the code in a zip file. We need to create the Lambda function in our local machine and upload the package file. We can create the Lambda function easily in Visual Studio with the template given in AWS Toolkit for Visual Studio. AWS Toolkit for Visual Studio have some templates for creating AWS Lambda functions easily using .NET Core. This post will guide you to create a Lambda function in .Net core using Visual Studio

Prerequisites

Following are the prerequisites for creating and deploying Lambda functions in Visual Studio

Create a .NET Core Lambda in Visual Studio

Following are the steps to create a Lambda function in Visual Studio
1) Open Visual Studio -> File menu -> New -> Project.
2) In the New Project dialog box, Select "AWS Lambda" under Installed -> Visual C#

     It will show you two types of project.
a) AWS Lambda project: These templates are for creating a project to develop and deploy an                 individual Lambda function.
b) AWS Serverless Application: These templates are for creating Lambda functions with a server-less AWS CloudFormation template. AWS server-less applications enable you to define more than just the function. For example, you can simultaneously create a database, add IAM roles, etc., with server-less deployment. AWS server-less applications also enable you to deploy multiple functions at one time.

3) Select AWS Lambda Project (.NET Core - C#) template.
4) Enter Name and Location for the project.
5) In the next screen, select Blue print for the Lambda you want to develop. For this example, I am selecting Empty Template.
6) It will create the project with the following structure 
Here, we need to examine two files
  • Function.cs
  • aws-lambda-tools-defaults.json

Function.cs 

Following is the sample code which was created automatically in Function.cs
using System;
using System.Collections.Generic;
using System.Linq;
using System.Threading.Tasks;

using Amazon.Lambda.Core;

// Assembly attribute to enable the Lambda function's JSON input to be converted into a .NET class.
[assembly: LambdaSerializer(typeof(Amazon.Lambda.Serialization.Json.JsonSerializer))]

namespace LambdaSample
{
    public class Function
    {
        
        /// 
        /// A simple function that takes a string and does a ToUpper
        /// 
        /// 
        /// 
        /// 
        public string FunctionHandler(string input, ILambdaContext context)
        {
            return input?.ToUpper();
        }
    }
}
Here FunctionHandler is the function where we need to write out Lambda function code. The above code will take a string as parameter and will return the same in UPPER Case. Here ILambdaContext object provides properties with information about the invocation, function, and execution environment(Read more about ILambdaContext here). For the time being, I am not writing any logic in the function, but I just added some logs. My FunctionHandler is as below after adding some logs to it
public string FunctionHandler(string input, ILambdaContext context)
{
 context.Logger.LogLine($"Input string:{input}");
 var upperCaseValue = input?.ToUpper();
 context.Logger.LogLine($"Upper case value:{upperCaseValue}");
 return upperCaseValue;
}

aws-lambda-tools-defaults.json

This is the file from where the Lambda function creator reads the default values while deploying the lambda function. You can set the default values like, framework, run time, memory size, timeout, function-handler etc parameters required for Lambda. Here function-handler defines the starting functionof the Lambda. For our sample it is "LambdaSample::LambdaSample.Function::FunctionHandler". In this, first part indicates the NameSpace(LambdaSample), second part indicates the ClassName with namespace(LambdaSample.Function) and third part indicates the Function name in the class(FunctionHandler).

Following is the aws-lambda-tools-defaults.json file created automatically by Visual Studio
{
  "Information" : [
    "This file provides default values for the deployment wizard inside Visual Studio and the AWS Lambda commands added to the .NET Core CLI.",
    "To learn more about the Lambda commands with the .NET Core CLI execute the following command at the command line in the project root directory.",

    "dotnet lambda help",

    "All the command line options for the Lambda command can be specified in this file."
  ],

  "profile":"default",
  "region" : "us-east-1",
  "configuration" : "Release",
  "framework" : "netcoreapp2.1",
  "function-runtime":"dotnetcore2.1",
  "function-memory-size" : 256,
  "function-timeout" : 30,
  "function-handler" : "LambdaSample::LambdaSample.Function::FunctionHandler"
}

Note: If you change the class name or function name, you need to update function-handler in the above file

Publish the Lambda Function

1) In Solution Explorer, right-click the project, and then choose Publish to AWS Lambda.

2) On the Upload Lambda Function page, in Function Name, type a name for the function or select a previously published function to republish -> Choose Next.

3) In the Advanced Function Details page,
  • Select Existing role: Select any role assoicated with your role. The role is used to provide credentials for any AWS service calls made by the code in the function. Your account should have IAM:ListPolicies action, or the Role Name list will be empty and you will be unable to continue.
  • Change Memory & Timeout values if required. 
  • Assign VPC and its Subnets if those are required by your Lambda
  • Add any Environment variable that your Lambda function needs

4) Click on Upload
5) This will open Uploading function page as shown below and the screen will automatically closes after Lambda function uploaded to AWS account

6) After function uploaded successfully, it will opens the following screen which allows you to execute the lambda function, change the Configuration,Event Sources and check the logs from Visual Studio. 

Note: You can also open the above screen for any existing Lambda function by Opening "AWS Explorer" -> AWS Lambda -> Double click on the required function.

Invoke the Function from Visual Studio

We can invoke the Lambda function from Visual Studio directly by the screen shown in the above image

1) Select any Example Request to choose any predefined request. But for our sample, it is just accepting a string as input, I have given "gopiportal_test" in the Request box


2) Click on "Invoke" button
3) This will execute the Lambda function automatically and will show the Response and the function logs

That's it...
Happy Coding !😊

AWS Aurora Data API Helper Class - C#

As per Amazon documentation, Aurora is a MySQL and PostgreSQL-compatible relational database built for the cloud, that combines the performance and availability of traditional enterprise databases with the simplicity and cost-effectiveness of open source databases.Amazon Aurora is up to five times faster than standard MySQL databases and three times faster than standard PostgreSQL databases. It provides the security, availability, and reliability of commercial databases at 1/10th the cost. Amazon Aurora is fully managed by Amazon Relational Database Service (RDS), which automates time-consuming administration tasks like hardware provisioning, database setup, patching, and backups.

Benefits of Amazon Aurora

  1. High Performance and Scalability
  2. High Availability and Durability
  3. Highly Secure
  4. MySQL and PostgreSQL Compatible
  5. Fully Managed
  6. Migration Support

Connect to Aurora from Client application

We have two options to connect to Aurora database from our application
1) Using connection string with MySql / PostgreSQL libraries
In this we will use a traditional connection string method to connect to the Aurora MySQL / PostgreSQL. In this method, the client application should be in same VPC network where Aurora database exists.
2) Using Aurora data API
Here we will use API to run the SQL statements. In this method, there is no necessary to have the client application in same VPC as Aurora. 

As all are aware of conventional database calling, I am discussing about connecting to the database using Data API in this post

Prerequisites for Working with Data API in Aurora

1) Enable Data API option:
        For using the Aurora data API, we should enable Data API for the Aurora cluster. We can do in through RDS Console. While creating, this option will be available under Connectivity section. While modifying, you can find this option under Network & Security section.
2) Store DB cluster credentials in a secret:
Use AWS Secrets Manager to create a secret that contains credentials for the Aurora DB cluster. For instructions, check Creating a Basic Secret

Helper class

Following is my helper class in .NET / .NET Core using C#. You need to include the AWSSDK.RDSDataService Nuget package for working with it.
using Amazon;
using Amazon.RDSDataService;
using Amazon.RDSDataService.Model;
using Amazon.Runtime;
using System;
using System.Collections.Generic;
using System.Linq;
using System.Reflection;
using System.Threading.Tasks;

namespace AurorDotnet
{
    public class AuroraHelper
    {
        AmazonRDSDataServiceClient client;
        private readonly string accessKeyId, secretKey, secretArn, auroraServerArn, databaseName;
        private readonly RegionEndpoint region;
        public AuroraHelper(string accessKeyId, string secretKey, string region, string secretArn, string auroraServerArn, string database)
        {
            this.accessKeyId = accessKeyId;
            this.secretKey = secretKey;
            this.region = RegionEndpoint.GetBySystemName(region);
            this.secretArn = secretArn;
            this.auroraServerArn = auroraServerArn;
            this.databaseName = database;
            client = GetClient();
        }

        private AmazonRDSDataServiceClient GetClient()
        {
            if (client == null)
            {
                try
                {
                    client = new AmazonRDSDataServiceClient(accessKeyId, secretKey, region);
                }
                catch (AmazonRDSDataServiceException ex)
                { Console.WriteLine($"Error (AmazonRDSDataServiceException) creating RDS client", ex); }
                catch (AmazonServiceException ex)
                { Console.WriteLine($"Error (AmazonServiceException) creating RDS client", ex); }
                catch (Exception ex)
                { Console.WriteLine($"Error creating AWS S3 client", ex); }
            }
            return client;
        }

        /// <summary>
        /// Runs the command and returns the first record as given object type. If T is string, it return the first row first column data.
        /// </summary>
        /// <typeparam name="T">Object type to which the record to be converted</typeparam>
        /// <param name="sqlCommand">Database command which needs to be executed</param>
        /// <param name="parameters">Prameters for the sql statement</param>
        /// <returns></returns>
        public async Task<T> GetRow<T>(string sqlCommand, Dictionary<string, string> parameters = null)
        {
            var executeSqlRequest = CreateExecuteRequest(sqlCommand, parameters);

            var data = await client.ExecuteStatementAsync(executeSqlRequest);
            if (data.HttpStatusCode == System.Net.HttpStatusCode.OK && data.Records.Count > 0)
            {
                if (typeof(T) == typeof(string))
                    return (T)ParseValue(data.Records[0][0], "varchar");
                else return ParseRecord<T>(data);
            }

            return default(T);
        }

        /// <summary>
        /// Runs the command and returns the list of records of given object type
        /// </summary>
        /// <typeparam name="T">Object type to which the record to be converted</typeparam>
        /// <param name="sqlCommand">Database command which needs to be executed</param>
        /// <param name="parameters">Prameters for the sql statement</param>
        /// <returns></returns>
        public async Task<List<T>> GetRows<T>(string sqlCommand, Dictionary<string, string> parameters = null)
        {
            var executeSqlRequest = CreateExecuteRequest(sqlCommand, parameters);

            var data = await client.ExecuteStatementAsync(executeSqlRequest);
            if (data.HttpStatusCode == System.Net.HttpStatusCode.OK && data.Records.Count > 0)
                return ParseRecordSet<T>(data);

            return default(List<T>);
        }

        /// <summary>
        /// Executes the Sql command and returns number of records effected
        /// </summary>
        /// <param name="sqlCommand"></param>
        /// <param name="parameters"></param>
        /// <returns></returns>
        public async Task<long> ExecuteSql(string sqlCommand, Dictionary<string, string> parameters = null)
        {
            var executeSqlRequest = CreateExecuteRequest(sqlCommand, parameters);

            var data = await client.ExecuteStatementAsync(executeSqlRequest);
            if (data.HttpStatusCode == System.Net.HttpStatusCode.OK)
            {
                if (data.Records.Count > 0)
                    return Convert.ToInt64(data.Records[0][0]);
                else
                    return data.NumberOfRecordsUpdated;
            }

            return 0;
        }

        /// <summary>
        /// Creates the ExecuteStatementRequest for Aurora data api
        /// </summary>
        /// <param name="sqlCommand">Database command which needs to be executed</param>
        /// <param name="parameters">Prameters for the sql statement</param>
        /// <returns></returns>
        private ExecuteStatementRequest CreateExecuteRequest(string sqlCommand, Dictionary<string, string> parameters = null)
        {
            ExecuteStatementRequest executeStatementRequest = new ExecuteStatementRequest()
            {
                SecretArn = secretArn,
                ResourceArn = auroraServerArn,
                IncludeResultMetadata = true,
                ContinueAfterTimeout = true,
                Database = databaseName,
                Sql = sqlCommand
            };
            if (parameters != null && parameters.Count > 0)
                executeStatementRequest.Parameters.AddRange(BuildParams(parameters));
            return executeStatementRequest;
        }

        private List<SqlParameter> BuildParams(Dictionary<string, string> parameters)
        {
            var sqlParameters = parameters.Select(p => new SqlParameter { Name = p.Key, Value = new Field() { StringValue = p.Value, IsNull = string.IsNullOrEmpty(p.Value) } }).ToList();
            return sqlParameters;
        }

        /// <summary>
        /// Converts the Data api response to the given object type and returns the first record
        /// </summary>
        /// <typeparam name="T">Object type to which the record to be converted</typeparam>
        /// <param name="response">Data api response</param>
        /// <returns></returns>
        private T ParseRecord<T>(ExecuteStatementResponse response)
        {
            var records = response.Records[0].Zip(response.ColumnMetadata, (record, col) => new KeyValuePair<string, object>(col.Name, ParseValue(record, col.TypeName))).ToList();
            return ConvertRecordToEntity<T>(records);
        }

        /// <summary>
        /// Converts the Data api response to the given object type and returns the list of records
        /// </summary>
        /// <typeparam name="T">Object type to which the record to be converted</typeparam>
        /// <param name="response">Data api response</param>
        /// <returns></returns>
        private List<T> ParseRecordSet<T>(ExecuteStatementResponse response)
        {
            List<T> data = new List<T>();
            var records = response.Records.Select(x => x.Zip(response.ColumnMetadata, (record, col) => new KeyValuePair<string, object>(col.Name, ParseValue(record, col.TypeName))).ToList()).ToList();
            foreach (var r in records)
            {
                T item = ConvertRecordToEntity<T>(r);
                data.Add(item);
            }
            return data;
        }

        /// <summary>
        /// Maps the KeyValuePair list to object
        /// </summary>
        /// <typeparam name="T">Object type to which the record to be converted</typeparam>
        /// <param name="data">KeyValuePair list which needs to map to the object</param>
        /// <returns></returns>
        private T ConvertRecordToEntity<T>(List<KeyValuePair<string, object>> data)
        {
            Type temp = typeof(T);
            T obj = Activator.CreateInstance<T>();
            PropertyInfo[] propInfo = temp.GetProperties();

            foreach (var item in data)
            {
                foreach (var pro in propInfo)
                {
                    if (pro.Name.ToLower() == item.Key.ToLower())
                    {
                        pro.SetValue(obj, item.Value, null);
                    }
                }
            }
            return obj;
        }

        /// <summary>
        /// Parse the value from Amazon.RDSDataService.Model.Field
        /// </summary>
        /// <param name="field">Amazon.RDSDataService.Model.Field</param>
        /// <returns></returns>
        private object ParseValue(Field field, string colType)
        {
            object value = null;
            if (field.IsNull)
                value = null;
            if (field.ArrayValue != null)
                value = field.ArrayValue;

            switch (colType.ToLower())
            {
                case "int":
                case "smallint":
                    value = Convert.ToInt32(field.LongValue);
                    break;
                case "bigint":
                    value = field.LongValue;
                    break;
                case "tinyint":
                case "boolean":
                case "bit":
                    value = field.BooleanValue;
                    break;
                case "float":
                case "double":
                case "real":
                    value = field.DoubleValue;
                    break;
                case "blob":
                case "binary":
                case "varbinary":
                    value = field.BlobValue;
                    break;
                case "time":
                    if (TimeSpan.TryParse(field.StringValue, out TimeSpan time))
                        value = time;
                    break;
                case "date":
                case "datetime":
                    if (DateTime.TryParse(field.StringValue, out DateTime date))
                        value = date;
                    break;
                default:
                    value = field.StringValue;
                    break;
            }
            return value;
        }

    }
}

Usage:

Create the instance of the helper class as below

AuroraHelper auroraHelper = new AuroraHelper("<AWS Accesskey Id>", "<AWS Secret Key>", "<AWS region>", "<Aurora database secret store Arn>", "<Aurora database cluster Arn>", "<Aurora database name>");

Getting single record from the database

Dictionary<string, string> parameters = new Dictionary<string, string>()
{
 {"accountid","10" }
};
var command = "SELECT account.id,account.name,account.isactive FROM account WHERE account.id=:accountid LIMIT 1";
var data = await auroraHelper.GetRow<Account>(command, parameters);
Console.WriteLine(JsonConvert.SerializeObject(data));

Getting set of record from the database

Dictionary<string, string> parameters = new Dictionary<string, string>()
{
 {"accountname","%test%" }
};
var command = "SELECT account.id,account.accountname,account.isactive FROM account WHERE account.accountname LIKE :accountname";
var data = await auroraHelper.GetRows<Account>(command, parameters);
Console.WriteLine(JsonConvert.SerializeObject(data));

Executing an DDL Command

Dictionary<string, string> parameters = new Dictionary<string, string>()
{
 {"accountname","Gopiportal" },
 {"isactive","1" }
};
var command = "INSERT INTO account(accountname,isactive) VALUES(:accountname,:isactive)";
var data = await auroraHelper.ExecuteSql(command, parameters);
if(data>0)
 Console.WriteLine("Data inserted successfully");
else
 Console.WriteLine("Data insertion failed");

Executing a Stored procedure

Aurora Data API is not built for executing a stored procedure. But we can execute a stored procedure as an SQL command like below

Stored procedure which returns single record

Dictionary<string, string> parameters = new Dictionary<string, string>()
{
 {"accountid","10" }
};
var command = "CALL usp_getAccount(:accountid)";
var data = await auroraHelper.GetRow<Account>(command, parameters);

Stored procedure which returns multiple records

Dictionary<string, string> parameters = new Dictionary<string, string>()
{
 {"accountname","%test%" }
};
var command = "CALL usp_getAccounts(:accountname)";
var data = await auroraHelper.GetRows<Account>(command, parameters);

Stored procedure which deals with DDL command

Dictionary<string, string> parameters = new Dictionary<string, string>()
{
 {"accountname","Gopiportal" },
 {"isactive","1" }
};
var command = "CALL usp_insertAccount(:accountname,:isactive)";
var data = await auroraHelper.ExecuteSql<Account>(command, parameters);

Limitations of Executing Stored procedure using Data API

Following are the limitations using stored procedures with Data API
  1. It will not capture any output variables returned from stored procedure
  2. If the stored procedure returns more than one data set, it will hold the records for the first data set and ignore the remaining
  3. After executing an DDL command in the stored procedure, it will not return the NumberOfRecordsUpdated count. This value will always be zero. 
Read more about Aurora Data API here.

Happy Coding ! 😊

AWS: Simple Storage Service (S3) Helper Class - TransferUtility - C#

In my previous post, we learnt about Amazon S3 and upload / download / copy / delete the files(or objects) of an S3 bucket using C#. The methods given in the previous post uses a Single GET / PUT operations, so that it will upload / download upto 5 GB (Refer here) and we need to use Multipart Upload API. So for implementing the Multipart Upload API concept .NET uses TransferUtility class.

TransferUtility

TransferUtility is a high level utility for managing transfers to and from Amazon S3. It provides a simple API for uploading  and downloading content to/from Amazon S3. It uses Amazon S3 multipart upload API, so you can upload large objects, up to 5 TB. 

It uses multiple threads to upload multiple parts of a single file at once which increase throughput, when dealing with large content sizes and high bandwidth.

Configure the TransferUtility

There are three optional properties that you can configure:

ConcurrentServiceRequests 

Determines how many active threads or the number of concurrent asynchronous web requests will be used to upload/download the file. The default value is 10.

MinSizeBeforePartUpload

Gets or sets the minimum part size for upload parts in bytes. The default is 16 MB. Decreasing the minimum part size causes multipart uploads to be split into a larger number of smaller parts. Setting this value too low has a negative effect on transfer speeds, causing extra latency and network communication for each part.

NumberOfUploadThreads 

Gets or sets the number of executing threads. This property determines how many active threads will be used to upload the file. The default value is 10 threads.

Following is the C#.NET helper method for Upload / Download files using TransferUtility 
public class AmazonS3TransferHelper
{
 AmazonS3Client client;

 private static readonly ILog _logger = LogManager.GetLogger(typeof(AmazonS3TransferHelper));
 private readonly string accessKeyId, secretKey, serviceUrl;
 public AmazonS3TransferHelper(string accessKeyId, string secretKey, string serviceUrl)
 {
  this.accessKeyId = accessKeyId;
  this.secretKey = secretKey;
  this.serviceUrl = serviceUrl;
  client = GetClient();
 }

 /// <summary>
 /// Initializes and returns the AmazonS3 object
 /// </summary>
 /// <returns></returns>
 private AmazonS3Client GetClient()
 {
  if (client == null)
  {
   try
   {
    // S3 config object
    AmazonS3Config clientConfig = new AmazonS3Config
    {
     // Set the endpoint URL
     ServiceURL = serviceUrl
    };
    client = new AmazonS3Client(accessKeyId, secretKey, clientConfig);
   }
   catch (AmazonS3Exception ex)
   { _logger.Error($"Error (AmazonS3Exception) creating S3 client", ex); }
   catch (AmazonServiceException ex)
   { _logger.Error($"Error (AmazonServiceException) creating S3 client", ex); }
   catch (Exception ex)
   { _logger.Error($"Error creating AWS S3 client", ex); }
  }
  return client;
 }

 private TransferUtility GetTransferUtility()
 {
  var config = new TransferUtilityConfig()
  {
   ConcurrentServiceRequests = 10,
   MinSizeBeforePartUpload = 16 * 1024 * 1024
  };

  return new TransferUtility(GetClient(), config);
 }

 /// <summary>
 /// Uploads the file to the S3 bucket. 
 /// </summary>
 /// <param name="bucketNameWithPath">S3 bucket name along with the subfolders. Ex. If you are using a 'dev' folder under bucket 'myBucket', this value should be myBucket/dev</param>
 /// <param name="fileNameInS3">File name used to store the content in the bucket</param>
 /// <param name="fileContent">String content which needs to be stored in the file</param>
 /// <returns></returns>
 public async Task Upload(string bucketNameWithPath, string fileNameInS3, string fileContent)
 {
  _logger.Info("Entering AmazonS3TransferHelper.Upload");
  try
  {
   byte[] byteArray = Encoding.ASCII.GetBytes(fileContent);
   MemoryStream stream = new MemoryStream(byteArray);

   var tranferUtility = GetTransferUtility();
   var transferUploadRequest = new TransferUtilityUploadRequest
   {
    BucketName = bucketNameWithPath,
    Key = fileNameInS3,
    InputStream = stream
   };

   await tranferUtility.UploadAsync(transferUploadRequest); //commensing the transfer  
  }
  catch (Exception ex)
  {
   _logger.Error("Error in uploading file to s3 bucket", ex);
  }

  _logger.Info("Leaving AmazonS3TransferHelper.Upload");
 }

 /// <summary>
 /// Downloads the file from S3 bucket
 /// </summary>
 /// <param name="bucketNameWithPath">S3 bucket name along with the subfolders. Ex. If you are using a 'dev' folder under bucket 'myBucket', this value should be myBucket/dev</param>
 /// <param name="fileNameInS3">File which needs to be get from the bucket</param>
 /// <param name="localFilePath">Local folder path to store the file downloaded from S3</param>
 /// <returns></returns>
 public async Task Download(string bucketNameWithPath, string fileNameInS3, string localFilePath)
 {
  _logger.Info("Entering AmazonS3TransferHelper.Download");
  try
  {
   var tranferUtility = GetTransferUtility();
   var transferDownloadRequest = new TransferUtilityDownloadRequest
   {
    BucketName = bucketNameWithPath,
    Key = fileNameInS3,
    FilePath = localFilePath + "/" + fileNameInS3
   };

   await tranferUtility.DownloadAsync(transferDownloadRequest);
  }
  catch (Exception ex)
  {
   _logger.Error("Error in downloading file to s3 bucket", ex);
  }

  _logger.Info("Leaving AmazonS3TransferHelper.Download");
 }
}

Usage:

Create the helper class object
AmazonS3TransferHelper transferHelper = new AmazonS3TransferHelper(<accesskey>, <secret key>, <AWS S3 endpoint url>);
Upload:
Here, I am uploading S3.txt file to the dev folder in my S3 bucket named gopiBucket with name "S3Sample_1.txt".
string fileContent = File.ReadAllText("S3.txt");
await transferHelper.Upload("gopiBucket/dev", "S3Sample_1.txt", fileContent);
Download a file:
Downloading the file from dev folder to the "Downloads" folder in my solution. If the "Downloads" folder not exits, it will create new one.
await transferHelper.Download("gopiBucket/dev", "S3Sample_1.txt", "Downloads");
Happy Coding  😊!!

AWS: Simple Storage Service (S3) Helper Class - C#

As per Amazon, Amazon Simple Storage Service (S3) is storage for the Internet. It is designed to make web-scale computing easier for developers. It has a simple web services interface that you can use to store and retrieve any amount of data, at any time, from anywhere on the web. It gives any developer access to the same highly salable, reliable, fast, inexpensive data storage infrastructure that Amazon uses to run its own global network of web sites. The service aims to maximize benefits of scale and to pass those benefits on to developers.

Following is the helper class for working with the objects stored in Amazon S3 buckets using C#.NET. AWSSDK.S3 (https://www.nuget.org/packages/AWSSDK.S3/) is the NuGet package required to work with AWS S3.
public class AmazonS3Helper
{
 AmazonS3Client client;

 private static readonly ILog _logger = LogManager.GetLogger(typeof(AmazonS3Helper));
 private readonly string accessKeyId, secretKey, serviceUrl;
 public AmazonS3Helper(string accessKeyId, string secretKey, string serviceUrl)
 {
  this.accessKeyId = accessKeyId;
  this.secretKey = secretKey;
  this.serviceUrl = serviceUrl;
  client = GetClient();
 }

 /// <summary>
 /// Initializes and returns the AmazonS3 object
 /// </summary>
 /// <returns></returns>
 private AmazonS3Client GetClient()
 {
  if (client == null)
  {
   try
   {
    // S3 config object
    AmazonS3Config clientConfig = new AmazonS3Config
    {
     // Set the endpoint URL
     ServiceURL = serviceUrl
    };
    client = new AmazonS3Client(accessKeyId, secretKey, clientConfig);
   }
   catch (AmazonS3Exception ex)
   { _logger.Error($"Error (AmazonS3Exception) creating S3 client", ex); }
   catch (AmazonServiceException ex)
   { _logger.Error($"Error (AmazonServiceException) creating S3 client", ex); }
   catch (Exception ex)
   { _logger.Error($"Error creating AWS S3 client", ex); }
  }
  return client;
 }

 /// <summary>
 /// Uploads the file to the S3 bucket. 
 /// </summary>
 /// <param name="bucketNameWithPath">S3 bucket name along with the subfolders. Ex. If you are using a 'dev' folder under bucket 'myBucket', this value should be myBucket/dev</param>
 /// <param name="fileNameInS3">File name used to store the content in the bucket</param>
 /// <param name="fileContent">String content which needs to be stored in the file</param>
 /// <returns></returns>
 public async Task Upload(string bucketNameWithPath, string fileNameInS3, string fileContent)
 {
  _logger.Info("Entering AmazonS3Helper.Upload");
  try
  {
   byte[] byteArray = Encoding.ASCII.GetBytes(fileContent);
   MemoryStream stream = new MemoryStream(byteArray);

   var putRequest = new PutObjectRequest
   {
    BucketName = bucketNameWithPath,
    Key = fileNameInS3,
    InputStream = stream
   };
   await client.PutObjectAsync(putRequest);
  }
  catch (Exception ex)
  {
   _logger.Error("Error in uploading file to s3 bucket", ex);
  }

  _logger.Info("Leaving AmazonS3Helper.Upload");
 }


 /// <summary>
 /// Downloads the file from S3 bucket
 /// </summary>
 /// <param name="bucketNameWithPath">S3 bucket name along with the subfolders. Ex. If you are using a 'dev' folder under bucket 'myBucket', this value should be myBucket/dev</param>
 /// <param name="fileNameInS3">File which needs to be get from the bucket</param>
 /// <param name="downloadFolder">Local folder path to store the file downloaded from S3</param>
 /// <returns></returns>
 public async Task Download(string bucketNameWithPath, string fileNameInS3, string downloadFolder)
 {
  _logger.Info("Entering AmazonS3Helper.Download");
  try
  {
   var getRequest = new GetObjectRequest
   {
    BucketName = bucketNameWithPath,
    Key = fileNameInS3
   };
   using (GetObjectResponse response = await client.GetObjectAsync(getRequest))
   using (StreamReader reader = new StreamReader(response.ResponseStream))
   {
    var fileBody = reader.ReadToEnd(); // Now you process the response body.
    if (!Directory.Exists(downloadFolder))
     Directory.CreateDirectory(downloadFolder);
    // Append filename
    downloadFolder = downloadFolder + "/" + fileNameInS3;

    File.WriteAllText(downloadFolder, fileBody);
   }
  }
  catch (Exception ex)
  {
   _logger.Error("Error in downloading file to s3 bucket", ex);
  }

  _logger.Info("Leaving AmazonS3Helper.Download");
 }

 /// <summary>
 /// Copies a file from one bucket to another bucket
 /// </summary>
 /// <param name="sourceBucketWithPath">Source bucket name along with the subfolders. Ex. If you are using a 'dev' folder under bucket 'myBucket', this value should be myBucket/dev</param>
 /// <param name="sourceFileName">File name in source bucket</param>
 /// <param name="destinationBucketWithPath">Destination bucket name along with the subfolders. Ex. If you are using a 'dev' folder under bucket 'myBucket', this value should be myBucket/dev</param>
 /// <param name="destinationFileName">File name in destination bucket</param>
 /// <returns></returns>
 public async Task Copy(string sourceBucketWithPath, string sourceFileName, string destinationBucketWithPath, string destinationFileName)
 {
  _logger.Info("Entering AmazonS3Helper.Copy");
  try
  {
   var copyRequest = new CopyObjectRequest
   {
    SourceBucket = sourceBucketWithPath,
    SourceKey = sourceFileName,
    DestinationBucket = destinationBucketWithPath,
    DestinationKey = destinationFileName
   };
   await client.CopyObjectAsync(copyRequest);
  }
  catch (Exception ex)
  {
   _logger.Error("Error in copying file in S3", ex);
  }

  _logger.Info("Leaving AmazonS3Helper.Copy");
 }

 /// <summary>
 /// Lists all the files in the given bucket
 /// </summary>
 /// <param name="bucketName">S3 bucket name </param>
 /// <param name="path">Folder path in the bucket</param>
 /// <returns></returns>
 public async Task<List<S3Object>> ListFiles(string bucketName, string path = "")
 {
  List<S3Object> files = new List<S3Object>();
  _logger.Info("Entering AmazonS3Helper.ListFiles");
  try
  {
   var listRequest = new ListObjectsV2Request
   {
    BucketName = bucketName,
    MaxKeys = 10
   };

   if (!string.IsNullOrEmpty(path))
   {
    if (path[path.Length - 1] != '/')
     path += "/";
    listRequest.Prefix = path;
   }

   ListObjectsV2Response response;
   do
   {
    response = await client.ListObjectsV2Async(listRequest);
    files.AddRange(response.S3Objects);
    listRequest.ContinuationToken = response.NextContinuationToken;
   } while (response.IsTruncated);


  }
  catch (Exception ex)
  {
   _logger.Error("Error while listing files in S3", ex);
  }
  _logger.Info("Leaving AmazonS3Helper.ListFiles");
  return files;
 }

 /// <summary>
 /// Deletes the file from S3 bucket
 /// </summary>
 /// <param name="bucketNameWithPath">S3 bucket name along with the subfolders. Ex. If you are using a 'dev' folder under bucket 'myBucket', this value should be myBucket/dev</param>
 /// <param name="fileNameInS3">File which needs to be delete from the bucket</param>
 /// <returns></returns>
 public async Task Delete(string bucketNameWithPath, string fileNameInS3)
 {
  _logger.Info("Entering AmazonS3Helper.Delete");
  try
  {
   var deleteObjectRequest = new DeleteObjectRequest
   {
    BucketName = bucketNameWithPath,
    Key = fileNameInS3
   };

   await client.DeleteObjectAsync(deleteObjectRequest);
  }
  catch (Exception ex)
  {
   _logger.Error("Error in deleting file from s3 bucket", ex);
  }

  _logger.Info("Leaving AmazonS3Helper.Delete");
 }

 /// <summary>
 /// Deletes multiple files from S3 bucket
 /// </summary>
 /// <param name="bucketName">S3 bucket name</param>
 /// <param name="path">Folder path in the bucket</param>
 /// <returns></returns>
 public async Task<int> DeleteFolder(string bucketName, string path)
 {
  var fileDeleted = 0;
  _logger.Info("Entering AmazonS3Helper.MultipleDelete");
  try
  {
   var files = await ListFiles(bucketName, path);

   // Converting filesnames as KeyVersions List
   List<KeyVersion> keyVersions = files.Select(x => new KeyVersion() { Key = x.Key }).ToList();

   var deleteObjectsRequest = new DeleteObjectsRequest
   {
    BucketName = bucketName,
    Objects = keyVersions
   };
   DeleteObjectsResponse response = await client.DeleteObjectsAsync(deleteObjectsRequest);
   fileDeleted = response.DeletedObjects.Count;
  }
  catch (DeleteObjectsException e)
  {
   _logger.Error("Error in deleting files from s3 bucket");
   // Catch the successfully deleted files count
   fileDeleted = e.Response.DeletedObjects.Count;
   foreach (DeleteError deleteError in e.Response.DeleteErrors)
   {
    _logger.Error($"Object Key: {deleteError.Key}\t{deleteError.Code}\t{deleteError.Message}");
   }
  }
  catch (Exception ex)
  {
   _logger.Error("Error in deleting files from s3 bucket", ex);
  }
  _logger.Info("Leaving AmazonS3Helper.MultipleDelete");
  return fileDeleted;
 }

 /// <summary>
 /// Deletes multiple files from S3 bucket
 /// </summary>
 /// <param name="bucketName">S3 bucket name</param>
 /// <param name="path">Folder path in the bucket</param>
 /// <param name="fileNamesInS3">Files which needs to be delete from the bucket</param>
 /// <returns></returns>
 public async Task<int> Delete(string bucketName,  string[] fileNamesInS3, string path="")
 {
  var fileDeleted = 0;
  _logger.Info("Entering AmazonS3Helper.MultipleDelete");
  try
  {
   if (!string.IsNullOrEmpty(path))
   {
    if (path[path.Length - 1] != '/')
     path += "/";
   }
   // Converting filesnames as KeyVersions List
   List<KeyVersion> keyVersions = fileNamesInS3.Select(x => new KeyVersion() { Key = path + x }).ToList();

   var deleteObjectsRequest = new DeleteObjectsRequest
   {
    BucketName = bucketName,
    Objects = keyVersions
   };
   DeleteObjectsResponse response = await client.DeleteObjectsAsync(deleteObjectsRequest);
   fileDeleted = response.DeletedObjects.Count;
  }
  catch (DeleteObjectsException e)
  {
   _logger.Error("Error in deleting files from s3 bucket");
   // Catch the successfully deleted files count
   fileDeleted = e.Response.DeletedObjects.Count;
   foreach (DeleteError deleteError in e.Response.DeleteErrors)
   {
    _logger.Error($"Object Key: {deleteError.Key}\t{deleteError.Code}\t{deleteError.Message}");
   }
  }
  catch (Exception ex)
  {
   _logger.Error("Error in deleting files from s3 bucket", ex);
  }
  _logger.Info("Leaving AmazonS3Helper.MultipleDelete");
  return fileDeleted;
 }
}

Usage:

Create the helper class object
AmazonS3Helper amazonS3Helper = new AmazonS3Helper(<accesskey>, <secret key>, <AWS S3 endpoint url>);

Upload a file
Here, I am uploading S3.txt file to the dev folder in my S3 bucket named gopiBucket with name "S3Sample_1.txt"
string fileContent = File.ReadAllText("S3.txt");
await amazonS3Helper.Upload("gopiBucket/dev", "S3Sample_1.txt", fileContent);

Copy File:
Copy file method copies the file from one bucket to another bucket or one folder to another folder in a bucket. Here, I am copying my file from dev folder to prod folder in same bucket
await amazonS3Helper.Copy("gopiBucket/dev", "S3Sample_1.txt", "gopiBucket/prod", "S3Sample_1_prod.txt");

List files:
Here I am listing all the files in prod folder.
var files = await amazonS3Helper.ListFiles("gopiBucket", "prod");
foreach (var file in files)
{
 Console.WriteLine($"{file.Key}\t{file.Size}");
}

Download a file:
Donwloading the file from dev folder to the "Downloads" folder in my solution. If the "Downloads" folder not exits, it will create new one.
await amazonS3Helper.Download("gopiBucket/dev", "S3Sample_1.txt", "Downloads");
Delete a file:
await amazonS3Helper.Delete("gopiBucket/prod", "S3Sample_1_prod.txt");
Delete multiple files:
string[] filesToDelete = new string[] { "S3Sample_1_prod.txt", "S3Sample_2_prod.txt", "S3Sample_3_prod.txt" };
await amazonS3Helper.Delete("gopiBucket", filesToDelete, "prod");
Delete a completed folder:
await amazonS3Helper.DeleteFolder("gopiBucket", "prod/S1")
Note: The above mentioned Upload and Download operation methods uploads / downloads the files using a single GET / PUT operation. So you can upload / download objects up to 5 GB in size. If you want to store / retrieve more than 5GB, you need to use Multipart Upload API. I will give the Multipart Upload API details in my next post.

Happy Coding 😊 !!


Increase request timeout of ASP.NET Core API hosted in Azure App Service

If you are using ASP.NET Core 2.0 API and deploying to an Azure App Service, and if the process takes more than 2 minutes, then you will get 502 Bad Gateway response with the message "The specified CGI application encountered an error and the server terminated the process".

You can fix this by adding web.config file to your project -> uncomment <system.webServer> block and add requestTimeout="00:20:00" as shown below

<?xml version="1.0" encoding="utf-8"?>
<configuration>
  <!-- To customize the asp.net core module uncomment and edit the following section. 
  For more info see https://go.microsoft.com/fwlink/?linkid=838655 -->
  
  <system.webServer>
    <handlers>
      <remove name="aspNetCore"/>
      <add name="aspNetCore" path="*" verb="*" modules="AspNetCoreModule" resourceType="Unspecified"/>
    </handlers>
    <aspNetCore processPath="%LAUNCHER_PATH%" arguments="%LAUNCHER_ARGS%" stdoutLogEnabled="false" stdoutLogFile=".\logs\stdout" forwardWindowsAuthToken="false" requestTimeout="00:20:00"/>
  </system.webServer>
    
</configuration>

Happy Coding  😊!!

AWS: Envelop Encryption & Decryption using AWS Key Management Service (Envelop encryption)

As per Amazon, AWS Key Management Service (AWS KMS) is a managed service that makes it easy for you to create and control the encryption keys used to encrypt your data. The master keys that you create in AWS KMS are protected by FIPS 140-2 validated cryptographic modules.

The primary resources in AWS KMS are customer master keys (CMKs). You can use a CMK to encrypt and decrypt up to 4 KB (4096 bytes) of data. Typically, you use CMKs to generate, encrypt, and decrypt the data keys that you use outside of AWS KMS to encrypt your data. This strategy is known as envelope encryption.

Encryption process

  • Generate a data key using the GenerateDataKey operation of AWS KMS. The operation returns a plaintext copy of the data key and a copy of the data key encrypted using the master key (CMK)
  • Encrypt the data with the plain data key and destroy the key
  • We can store this encrypted key along with our encrypted message.The message can’t be decrypted unless you can decrypt the data key and the data key can’t be decrypted unless you have access to the master key.

Decryption process

  • Decrypt the encrypted key using our master key to get the plain data key
  • Decrypt the data with the plain data key
You can read the KMS concepts here.

Following is the helper class for Encrypt or Decrypt the data with KMS key in .NET/.NET Core with C#. AWSSDK.KeyManagementService  is the nuget package required to work with AWS KMS.

using Amazon.KeyManagementService;
using Amazon.KeyManagementService.Model;
using Amazon.Runtime;
using log4net;
using System;
using System.IO;
using System.Security.Cryptography;
using System.Text;
using System.Threading.Tasks;


public class KMSHelper
{
    private AmazonKeyManagementServiceClient client;
    private static readonly ILog _logger = LogManager.GetLogger(typeof(KMSHelper));
    private readonly string accessKey, secretKey, serviceUrl;

    public KMSHelper(string accessKey, string secretKey, string serviceUrl)
    {
        this.accessKey = accessKey;
        this.secretKey = secretKey;
        this.serviceUrl = serviceUrl;
        client = GetClient();
    }

    private AmazonKeyManagementServiceClient GetClient()
    {
        if (client == null)
        {
            try
            {
                // DynamoDB config object
                AmazonKeyManagementServiceConfig clientConfig = new AmazonKeyManagementServiceConfig
                {
                    // Set the endpoint URL
                    ServiceURL = serviceUrl
                };
                client = new AmazonKeyManagementServiceClient(accessKey, secretKey, clientConfig);
            }
            catch (AmazonKeyManagementServiceException ex)
            { _logger.Error($"Error (AmazonKeyManagementServiceException) creating KMS client", ex); }
            catch (AmazonServiceException ex)
            { _logger.Error($"Error (AmazonServiceException) creating KMS client", ex); }
            catch (Exception ex)
            { _logger.Error($"Error creating KMS client", ex); }
        }
        return client;
    }

    /// <summary>
    /// Generates new data key under the master key
    /// </summary>
    /// <param name="masterKeyId">Master key</param>
    /// <returns></returns>
    private async Task<MemoryStream> GenerateDataKey(string masterKeyId)
    {
        using (var kmsClient = GetClient())
        {
            var result = await kmsClient.GenerateDataKeyAsync(new GenerateDataKeyRequest
            {
                KeyId = masterKeyId,
                KeySpec = DataKeySpec.AES_256
            });

            return result.CiphertextBlob;
        }
    }

    /// <summary>
    /// Decrypts the data key using the master key
    /// </summary>
    /// <param name="ciphertext">Stream to decrypt</param>
    /// <returns></returns>
    private async Task<MemoryStream> DecryptDataKey(MemoryStream ciphertext)
    {
        using (var kmsClient = GetClient())
        {
            var decryptionResponse = await kmsClient.DecryptAsync(new DecryptRequest
            {
                CiphertextBlob = ciphertext
            });

            return decryptionResponse.Plaintext;
        }
    }

    /// <summary>
    /// Encrypts the data key using the master key
    /// </summary>
    /// <param name="masterKeyId">Master key arn</param>
    /// <param name="plaintext">Plain data key</param>
    /// <returns></returns>
    private async Task<string> EncryptDataKey(string masterKeyId, MemoryStream plaintext)
    {
        using (var kmsClient = new AmazonKeyManagementServiceClient(accessKey, secretKey, serviceUrl))
        {
            var encryptionResponse = await kmsClient.EncryptAsync(new EncryptRequest
            {
                KeyId = masterKeyId,
                Plaintext = plaintext
            });

            return Convert.ToBase64String(encryptionResponse.CiphertextBlob.ToArray());
        }
    }

    /// <summary>
    /// Encrypts the text using the master key
    /// </summary>
    /// <param name="textToEncrypt">Text to encrypt</param>
    /// <param name="masterKeyId">Master key arn</param>
    /// <returns></returns>
    public async Task<string> Encrypt(byte[] textToEncrypt, string masterKeyId)
    {
        var kmsClient = new AmazonKeyManagementServiceClient(accessKey, secretKey, serviceUrl);

        using (var algorithm = Aes.Create())
        {
            // Create the streams used for encryption.
            using (MemoryStream msEncrypt = new MemoryStream())
            {
                // Generates the data key under the master key
                var dataKey = await kmsClient.GenerateDataKeyAsync(new GenerateDataKeyRequest
                {
                    KeyId = masterKeyId,
                    KeySpec = DataKeySpec.AES_256
                });

                msEncrypt.WriteByte((byte)dataKey.CiphertextBlob.Length);
                dataKey.CiphertextBlob.CopyTo(msEncrypt);
                algorithm.Key = dataKey.Plaintext.ToArray();

                // Writing algorithm.IV in output stream for decryption purpose.
                msEncrypt.Write(algorithm.IV, 0, algorithm.IV.Length);

                // Create a decrytor to perform the stream transform.
                ICryptoTransform encryptor = algorithm.CreateEncryptor(algorithm.Key, algorithm.IV);

                using (CryptoStream csEncrypt = new CryptoStream(msEncrypt, encryptor, CryptoStreamMode.Write))
                {
                    using (MemoryStream input = new MemoryStream(textToEncrypt))
                    {
                        input.CopyTo(csEncrypt);
                        csEncrypt.FlushFinalBlock();
                    }
                    return Convert.ToBase64String(msEncrypt.ToArray());
                }
            }
        }
    }

    /// <summary>
    /// Decrypts the text encrypted with the master key
    /// </summary>
    /// <param name="textToDecrypt">Encrypted text to decrypt</param>
    /// <returns></returns>
    public async Task<string> Decrypt(byte[] textToDecrypt)
    {
        // Create the streams used for decryption.
        using (MemoryStream msDecrypt = new MemoryStream(textToDecrypt))
        {
            var length = msDecrypt.ReadByte();
            var buffer = new byte[length];
            msDecrypt.Read(buffer, 0, length);

            // Decrypt the datakey
            MemoryStream dataKeyCipher = await DecryptDataKey(new MemoryStream(buffer));

            using (var algorithm = Aes.Create())
            {
                algorithm.Key = dataKeyCipher.ToArray();

                var iv = algorithm.IV;
                msDecrypt.Read(iv, 0, iv.Length);
                algorithm.IV = iv;

                // Create a decrytor to perform the stream transform.
                ICryptoTransform decryptor = algorithm.CreateDecryptor(algorithm.Key, algorithm.IV);

                using (CryptoStream csDecrypt = new CryptoStream(msDecrypt, decryptor, CryptoStreamMode.Read))
                {
                    using (MemoryStream srDecrypt = new MemoryStream())
                    {
                        csDecrypt.CopyTo(srDecrypt);

                        //Write all data to the stream.
                        return Encoding.ASCII.GetString(srDecrypt.ToArray());
                    }
                }
            }
        }
    }
}
Happy Coding!😊

AWS: Set DynamoDB Table name based on environment

In DynamoDB we can differentiate the tables per environment by prefixing the tables with environment.
e.g. A table "Account" can be created per environment as "Dev_Account", "QA_Account","UAT_Account".

But in the API, we cannot use table names separately for each environment. So, for this situation, we can specify the prefix for the tables globally using the "TableNamePrefix" property on the "DynamoDBContextConfig" object in Startup class under ConfigureServices method as below

var tableNamePrefix = Configuration.GetSection("DynamoDBConfig")["tableNamePrefix"];
if (!string.IsNullOrEmpty(tableNamePrefix))
    AWSConfigsDynamoDB.Context.TableNamePrefix = tableNamePrefix;

Here, we are getting the table prefix from the configuration file and setting the value as dynamodb table prefix globally.

AWS DynamoDB Helper class - C# and .NET Core

As per Amazon, DynamoDB is a key-value and document database that delivers single-digit millisecond performance at any scale. It's a fully managed, multi-region, multi-master database with built-in security, backup and restore, and in-memory caching for internet-scale applications.
With DynamoDB, you can create database tables that can store and retrieve any amount of data, and serve any level of request traffic. You can scale up or scale down your table's throughput capacity without downtime or performance degradation, and use the AWS Management Console to monitor resource utilization and performance metrics.

Amazon DynamoDB provides on-demand backup capability. It allows you to create full backups of your tables for long-term retention and archival for regulatory compliance needs.

DynamoDB automatically spreads the data and traffic for your tables over a sufficient number of servers to handle your throughput and storage requirements, while maintaining consistent and fast performance. All of your data is stored on solid state disks (SSDs) and automatically replicated across multiple Availability Zones in an AWS region, providing built-in high availability and data durability.

AWS provides 3 types of interfaces to work with DynamoDB

1) Low-Level Interfaces

Every language-specific AWS SDK provides a low-level interface for DynamoDB, with methods that closely resemble low-level DynamoDB API requests.
Availability: A low-level interface is available in every language-specific AWS SDK.

2) Document Interfaces

Many AWS SDKs provide a document interface, allowing you to perform data plane operations (create, read, update, delete) on tables and indexes. With a document interface, you do not need to specify Data Type Descriptors; the data types are implied by the semantics of the data itself. These AWS SDKs also provide methods to easily convert JSON documents to and from native DynamoDB data types
Availability: Document interfaces are available in the AWS SDKs for Java, .NET, Node.js, and JavaScript in the browser.

3) High-Level or Object Persistence Interface

Some AWS SDKs provide an object persistence interface where you do not directly perform data plane operations. Instead, you create objects that represent items in DynamoDB tables and indexes, and interact only with those objects. This allows you to write object-centric code, rather than database-centric code. 
Availability: Object persistence interfaces are available in the AWS SDKs for Java and .NET

Following is the helper class for working with DynamoDB in .net Core with C# for Object Persistence model. AWSSDK.DynamoDBv2 is the nuget package required to work with DynamoDB.

using Amazon.DynamoDBv2;
using Amazon.DynamoDBv2.DataModel;
using Amazon.DynamoDBv2.Model;
using Amazon.Runtime;
using log4net;
using System;
using System.Collections.Generic;
using System.Threading;
using System.Threading.Tasks;

namespace UtilityServices.DynamoDB
{
    public class DynamoDBHelper
    {
        AmazonDynamoDBClient client;
        private static readonly ILog _logger = LogManager.GetLogger(typeof(DynamoDBHelper));
        private readonly string accessKeyId, secretKey, serviceUrl;

        public DynamoDBHelper(string accessKeyId, string secretKey, string serviceUrl)
        {
            this.accessKeyId = accessKeyId;
            this.secretKey = secretKey;
            this.serviceUrl = serviceUrl;
            client = GetClient();
        }

        /// <summary>
        /// Initializes and returns the DynamoDBClient object
        /// </summary>
        /// <returns></returns>
        private AmazonDynamoDBClient GetClient()
        {
            if (client == null)
            {
                try
                {
                    // DynamoDB config object
                    AmazonDynamoDBConfig clientConfig = new AmazonDynamoDBConfig
                    {
                        // Set the endpoint URL
                        ServiceURL = serviceUrl
                    };
                    client = new AmazonDynamoDBClient(accessKeyId, secretKey, clientConfig);
                }
                catch (AmazonDynamoDBException ex)
                { _logger.Error($"Error (AmazonDynamoDBException) creating dynamodb client", ex); }
                catch (AmazonServiceException ex)
                { _logger.Error($"Error (AmazonServiceException) creating dynamodb client", ex); }
                catch (Exception ex)
                { _logger.Error($"Error creating dynamodb client", ex); }
            }
            return client;
        }

        /// <summary>
        /// Creates new table in DynamoDB
        /// </summary>
        /// <param name="tableName">name of the table to create</param>
        /// <param name="hashKey">Hash key name</param>
        /// <param name="haskKeyType">Hask key type</param>
        /// <param name="rangeKey">range key name</param>
        /// <param name="rangeKeyType">range key type</param>
        public async Task CreateTable(string tableName, string hashKey, ScalarAttributeType haskKeyType, string rangeKey = null, ScalarAttributeType rangeKeyType = null)
        {
            // Build a 'CreateTableRequest' for the new table
            CreateTableRequest createRequest = new CreateTableRequest
            {
                TableName = tableName,
                ProvisionedThroughput = new ProvisionedThroughput
                {
                    ReadCapacityUnits = 5,
                    WriteCapacityUnits = 5
                }
            };
            List<KeySchemaElement> schemaElements = new List<KeySchemaElement>();
            List<AttributeDefinition> attributeDefinitions = new List<AttributeDefinition>();

            schemaElements.Add(new KeySchemaElement
            {
                AttributeName = hashKey,
                KeyType = KeyType.HASH
            });

            attributeDefinitions.Add(new AttributeDefinition
            {
                AttributeName = hashKey,
                AttributeType = haskKeyType
            }
            );

            if (!string.IsNullOrEmpty(rangeKey) && !string.IsNullOrEmpty(rangeKeyType))
            {
                schemaElements.Add(new KeySchemaElement
                {
                    AttributeName = rangeKey,
                    KeyType = KeyType.RANGE
                });
                attributeDefinitions.Add(new AttributeDefinition
                {
                    AttributeName = rangeKey,
                    AttributeType = rangeKeyType
                }
               );
            }

            try
            {
                var client = GetClient();
                await client.CreateTableAsync(createRequest);
                bool isTableAvailable = false;
                while (!isTableAvailable)
                {
                    Thread.Sleep(2000);
                    var tableStatus = await client.DescribeTableAsync(tableName);
                    isTableAvailable = tableStatus.Table.TableStatus == "ACTIVE";
                }
            }
            catch (Exception ex)
            {
                _logger.Fatal($"Error: failed to create the new table:{ex.Message}");
                return;
            }
        }

        /// <summary>
        /// Get all the records from the given table
        /// </summary>
        /// <typeparam name="T">Table object</typeparam>
        /// <returns></returns>
        public async Task<IList<T>> GetAll<T>()
        {
            var context = new DynamoDBContext(GetClient());
            // Here we are passing the ScanCoditions as empty to get all the rows
            List<ScanCondition> conditions = new List<ScanCondition>();
            return await context.QueryAsync<T>(conditions).GetRemainingAsync();
        }

        /// <summary>
        /// Get the rows from the given table which maches the given key and conditions 
        /// </summary>
        /// <typeparam name="T">Table object</typeparam>
        /// <param name="keyValue">hash key value</param>
        /// <param name="scanConditions">any other scan conditions</param>
        /// <returns></returns>
        public async Task<IList<T>> GetRows<T>(object keyValue, List<ScanCondition> scanConditions = null)
        {
            var context = new DynamoDBContext(GetClient());
            DynamoDBOperationConfig config = null;

            if (scanConditions != null && scanConditions.Count > 0)
            {
                config = new DynamoDBOperationConfig()
                {
                    QueryFilter = scanConditions
                };
            }
            return await context.QueryAsync<T>(keyValue, config).GetRemainingAsync();
        }

        /// <summary>
        /// Get the rows from the given table which maches the given conditions 
        /// </summary>
        /// <typeparam name="T"> Table object</typeparam>
        /// <param name="scanConditions"></param>
        /// <returns></returns>
        public async Task<IList<T>> GetRows<T>(List<ScanCondition> scanConditions)
        {
            var context = new DynamoDBContext(GetClient());
            return await context.ScanAsync<T>(scanConditions).GetRemainingAsync();
        }

        /// <summary>
        /// Gets a record which matches the given key value
        /// </summary>
        /// <typeparam name="T">Table object</typeparam>
        /// <param name="keyValue">Hash key value</param>
        /// <returns></returns>
        public T Load<T>(object keyValue)
        {
            var context = new DynamoDBContext(GetClient());
            return context.LoadAsync<T>(keyValue).Result;
        }

        /// <summary>
        /// Saves the given record in the table
        /// </summary>
        /// <typeparam name="T">Table object</typeparam>
        /// <param name="document">Record to save in the table</param>
        /// <returns></returns>
        public async Task Save<T>(T document)
        {
            var context = new DynamoDBContext(GetClient());
            await context.SaveAsync(document);
        }

        /// <summary>
        /// Deletes the given record in the table
        /// </summary>
        /// <typeparam name="T">Table object</typeparam>
        /// <param name="document">Record to be removed from the table</param>
        /// <returns></returns>
        public async Task Delete<T>(T document)
        {
            var context = new DynamoDBContext(GetClient());
            await context.DeleteAsync(document);
        }

        /// <summary>
        /// Saves batch of records in the table
        /// </summary>
        /// <typeparam name="T">Table object</typeparam>
        /// <param name="documents">Records to be saved</param>
        /// <returns></returns>
        public async Task BatchSave<T>(IEnumerable<T> documents)
        {
            var context = new DynamoDBContext(GetClient());
            var batch = context.CreateBatchWrite<T>();
            batch.AddPutItems(documents);
            await batch.ExecuteAsync();
        }

        /// <summary>
        /// Deletes batch of records in the table
        /// </summary>
        /// <typeparam name="T">Table object</typeparam>
        /// <param name="documents">Records to be delete</param>
        /// <returns></returns>
        public async Task BatchDelete<T>(IEnumerable<T> documents)
        {
            var context = new DynamoDBContext(GetClient());
            var batch = context.CreateBatchWrite<T>();
            batch.AddDeleteItems(documents);
            await batch.ExecuteAsync();
        }
    }
}

Happy Coding 😊!

In-Memory cache in ASP.NET core

ASP.NET Core provides In-Memory caching to boost our application performance and scalability by storing frequently changing data in the In-Memory cache.

Enable In-Memory caching

To enable In-Memory in ASP.NET core application we need to add the AddMemoryCache() option in ConfigureServices method of Startup class as shown below

public void ConfigureServices(IServiceCollection services)
{
 services.AddOptions();
 services.AddMvc().AddJsonOptions(options =>
 {
  // To override the default camel case conversion in serilization
  options.SerializerSettings.ContractResolver
   = new Newtonsoft.Json.Serialization.DefaultContractResolver();
 });

 // Enable In-Memory cache Service
 services.AddMemoryCache();
}
To work with In-Memory cache, we need to inject the IMemoryCache interface to our class / controller class . It contains some Extension methods to work with In-Memory cache. 

private IMemoryCache cache;

public TestCacheController(IMemoryCache cache)
{
 this.cache = cache;
}

Store a value in the cache

To store an object, we need to use the Set Extension method of IMemoryCache interface.
cache.Set(“AccountId”, accountId);

Retrieve a value from the cache

To retrieve the value from the cache we can use any of the following options

1) Get<T>: 

Retrieve the value from the cache. It will return null if the value not exists in the cache
int accountId=cache.Get<int>("AccountId”);

2) TryGetValue<T>:

Using this method we can check if the specified key exists in the cache

int accountId;

if(!cache.TryGetValue<int>("AccountId”,out accountId))
{
 return "No value found!";
}
return accountId.ToString();

3) GetOrCreate<T>or GetOrCreateAsync<T>:

Retrive the value from the cache. If the key doesn’t exist, it will add the value to cache

int accountId= cache.GetOrCreate<int>("AccountId”,
   cacheEntry => {
      return 0
      });

This function also have async variant GetOrCreateAsync<T>.

Adding Expiration Policy

While adding the data to the cache, we can choose the expiration policy for it. We have two options for this: Absolute and Sliding

Absolute Expiration

Absolute expiration expires the cache item when the given time has been reached. Giving it a DateTime (or DateTimeOffset) in the future it will expire the item at that point. For setting, we need to use the MemoryCacheEntryOptions

MemoryCacheEntryOptions memoryCacheEntryOptions = new MemoryCacheEntryOptions()
{
 AbsoluteExpiration = TimeSpan.FromMinutes(5)
};

cache.Set("AccountId”,2,memoryCacheEntryOptions);
or we can directly use the overload method of Set like

cache.Set("AccountId”,2,DateTimeOffset.UtcNow.AddSeconds(500));

Sliding expiration

Sliding expiration expires the cacheitem if it has not been accessed within the timespan provided. This makes it easy to keep highly used items in cache. 

MemoryCacheEntryOptions memoryCacheEntryOptions = new MemoryCacheEntryOptions()
{
 SlidingExpiration = TimeSpan.FromMinutes(ModelConstants.ALLSCRIPTS_TOKEN_EXPIRATION_TIME)
};
cache.Set("AccountId”,2,memoryCacheEntryOptions);
We can also have the following options in MemoryCacheEntryOptions class

1) Priority: It specifies which objects should be removed from the cache as part of reclaim memory policy whenever the web server runs out of memory space. It is of type CacheItemPriority  enum. Possible values are Low, Normal, High, and NeverRemove

2) RegisterPostEvictionCallback: We can register a callback that will execute whenever and item is removed from the cache. 

MemoryCacheEntryOptions memoryCacheEntryOptions = new MemoryCacheEntryOptions()
{
 SlidingExpiration = TimeSpan.FromMinutes(ModelConstants.ALLSCRIPTS_TOKEN_EXPIRATION_TIME)
 Priority= CacheItemPriority.Normal;
};
For more information on MemoryCacheEntryOptions check here.

Happy Coding 😊! 

Web API - Basic Authentication

Basic Authentication

As per RFC 2617, HTTP Authentication: Basic and Digest Access Authentication, Basic Authentication is defined as client must authenticate itself with a user-ID and a password for each realm. Basic authentication is performed within the context of a "realm." The server includes the name of the realm in the WWW-Authenticate header. The user's credentials are valid within that realm. Simply to authenticate using Basic Authentication, client shoud pass credentials for each request in "Authentication" header as "Basic BASE64(ASCIIEncoding/ISO-8859-1 encoding of 'USERNAME:PASSWORD')".

Pros

  • Internet standard.
  • Supported by all major browsers.
  • Relatively simple protocol.

Cons

  • User credentials are sent in the request.
  • Credentials are sent as plaintext.
  • Credentials are sent with every request.
  • No way to log out, except by ending the browser session.
  • Vulnerable to cross-site request forgery (CSRF); requires anti-CSRF measures.


Adding Basic Authentication to Web API

To add the Basic authentication to our API, we need to override the OnAuthorization() method,which performs all the validations, in AuthorizeAttribute class. In that we need to check whether the header is present or not and if present, we need to extract the username and password and need to verify those details.

public class BasicAuthenticationAttribute : AuthorizeAttribute
{
 public override void OnAuthorization(HttpActionContext actionContext)
 {
  if (actionContext.Request.Headers.Authorization == null)
  {
   actionContext.Response = actionContext.Request.CreateResponse(HttpStatusCode.Unauthorized);
  }
  else
  {
   // Gets header parameters  
   string authenticationString = actionContext.Request.Headers.Authorization.Parameter;
   string decoded = ASCIIEncoding.ASCII.GetString(Convert.FromBase64String(authenticationString));
   var credentials = decoded.Split(':');
   
   // encoded string is invalid
   if(credentials.Length<=2)
    actionContext.Response = actionContext.Request.CreateResponse(HttpStatusCode.Unauthorized);

   // Validate username and password  
   if (!Validator.ValidateUser(credentials[0], credentials[1]))
   {
    // returns unauthorized error  
    actionContext.Response = actionContext.Request.CreateResponse(HttpStatusCode.Unauthorized);
   }
  }
 }
}
Here, Validator.ValidateUser is user function to validate the user details.

Passing Basic Authentication while calling Web API

In order to add Basic authentication header to a web api request we need to encode our credentials as below

string username = "Your username";
string password = "Your password";
string credentials = Convert.ToBase64String(ASCIIEncoding.ASCII.GetBytes($"{username}:{password}));
request.Headers.Add("Authorization", "Basic " + credentials);

Swagger Integration - Including the XML documentation from Sub Projects to ASP.NET Core Web API

While integrating Swagger in ASP.NET core Web API, if you enable the XML documentation for Web API and if you are using Sub projects(Ex: Model Project), then Swagger UI recognizes only the Web API documentation. It will not fetch the XML comments from the Sub Project. Using the following steps we can include the Sub Projects documentation also in the Swagger.

Using Visual Studio for Windows

  1. Enable XML documentation for the Sub project.
    • In Visual Studio, Right-click the project in Solution Explorer and select Properties
    • Check the XML documentation file box under the Output section of the Build tab
    • Remove the "bin\Debug" from the path, to get the xml file directly in the Solution folder
  2. Add the Generated XML file in the Web API as Link
    • Right-click on Project -> ADD -> Existing Item 
    • Browse and Select the file -> Click on dropdown arrow next to ADD button -> Select "Add as Link" (Adding the file as Link, will not copy the file to the project. Instead it will create a link to the Original file and you can see the changes immediately if you modify the original file)
  3. Open the file properties and Set Copy To Output Directory as "Copy Always"
  4. Add the following to the services.AddSwaggerGen method under ConfigService method in Startup.cs file
    var dir = new DirectoryInfo(AppContext.BaseDirectory);
    foreach (var fi in dir.EnumerateFiles("*.xml"))
    {
        c.IncludeXmlComments(fi.FullName);
    }
    
    Or you can specify all the files manually as
        // Adding the xml documentation of the Main project
        var xmlFile = $"{Assembly.GetEntryAssembly().GetName().Name}.xml";
        var xmlPath = Path.Combine(AppContext.BaseDirectory, xmlFile);
        c.IncludeXmlComments(xmlPath);
    
        // Adding the xml documentation of the Sub project
        xmlPath = Path.Combine(AppContext.BaseDirectory, "Scheduling.Model.xml");
        c.IncludeXmlComments(xmlPath);
    

Using Visual Studio Code

  1. Enable XML documentation for the Subproject by adding the following to .csproj file
    
      $(TargetFramework)\$(MSBuildProjectName).xml
    
  2. Add the Generated XML file in the Web API as Link and change it's property to Copy Always by adding the following to the Main project .csproj file
    
      
        Always


  3. Add the following to the services.AddSwaggerGen method under ConfigService method in Startup.cs file
    var dir = new DirectoryInfo(AppContext.BaseDirectory);
    foreach (var fi in dir.EnumerateFiles("*.xml"))
    {
        c.IncludeXmlComments(fi.FullName);
    }
    
    Or you can specify all the files manually as
        // Adding the xml documentation of the Main project
        var xmlFile = $"{Assembly.GetEntryAssembly().GetName().Name}.xml";
        var xmlPath = Path.Combine(AppContext.BaseDirectory, xmlFile);
        c.IncludeXmlComments(xmlPath);
    
        // Adding the xml documentation of the Sub project
        xmlPath = Path.Combine(AppContext.BaseDirectory, "Scheduling.Model.xml");
        c.IncludeXmlComments(xmlPath);
    
Happy Coding 😊

Integrating Swagger in ASP.NET Core Web API using Swashbuckle

When consuming a Web API, understanding its various methods can be challenging for a developer. Swagger, also known as Open API, solves the problem of generating useful documentation and help pages for Web APIs. It provides benefits such as interactive documentation, client SDK generation, and API discoverability.

Swagger

Swagger is a language-agnostic specification for describing REST APIs. The Swagger project was donated to the OpenAPI Initiative, where it's now referred to as Open API. Swagger is useful
  1.  To minimize the amount of work needed to connect disassociated services. 
  2.  To reduce the amount of time needed to accurately document a service.

Swagger specification (swagger.json)

The core to the Swagger flow is the Swagger specification—by default, a document named swagger.json. It's generated by the Swagger tool chain (or third-party implementations of it) based on your service. It describes the capabilities of your API and how to access it with HTTP. It drives the Swagger UI and is used by the tool chain to enable discovery and client code generation

Example

{
   "swagger": "2.0",
   "info": {
       "version": "v1",
       "title": "API V1"
   },
   "basePath": "/",
   "paths": {
       "/api/Todo": {
           "get": {
               "tags": [
                   "Todo"
               ],
               "operationId": "ApiTodoGet",
               "consumes": [],
               "produces": [
                   "text/plain",
                   "application/json",
                   "text/json"
               ],
               "responses": {
                   "200": {
                       "description": "Success",
                       "schema": {
                           "type": "array",
                           "items": {
                               "$ref": "#/definitions/TodoItem"
                           }
                       }
                   }
                }
           },
           "post": {
               ...
           }
       },
       "/api/Todo/{id}": {
           "get": {
               ...
           },
           "put": {
               ...
           },
           "delete": {
               ...
   },
   "definitions": {
       "TodoItem": {
           "type": "object",
            "properties": {
                "id": {
                    "format": "int64",
                    "type": "integer"
                },
                "name": {
                    "type": "string"
                },
                "isComplete": {
                    "default": false,
                    "type": "boolean"
                }
            }
       }
   },
   "securityDefinitions": {}
}

Swagger UI

Swagger UI offers a web-based UI that provides information about the service, using the generated Swagger specification.Swashbuckle include an embedded version of Swagger UI, so that it can be hosted in your ASP.NET Core app using a middleware registration call

Integrating Swagger using Swashbuckle

We can integrate the Swagger in our application using Swashbuckle with the following steps
  • Add package Swashbuckle.AspNetCore to the application
  • Add the Swagger generator to the services collection in the Startup.ConfigureServices method
using Swashbuckle.AspNetCore.Swagger;
public void ConfigureServices(IServiceCollection services)
{
    services.AddDbContext(opt => opt.UseInMemoryDatabase("TodoList"));
    services.AddMvc();

    // Register the Swagger generator, defining one or more Swagger documents
    services.AddSwaggerGen(c =>
    {
        c.SwaggerDoc("v1", new Info { Title = "My API", Version = "v1" });
    });
}
  • In the Startup.Configure method, enable the middleware for serving the generated JSON document and the Swagger UI
// Enable middleware to serve generated Swagger as a JSON endpoint. 
    app.UseSwagger();

    // Enable middleware to serve swagger-ui (HTML, JS, CSS, etc.), specifying the Swagger JSON endpoint.
    app.UseSwaggerUI(c =>
    {
        c.SwaggerEndpoint("/swagger/v1/swagger.json", "My API V1");
    });
  • This will enable the basic integration of the swagger. You can check the generated swagger docuement describing the endpoints in [BASE-URL]/swagger/v1/swagger.json and Swagger UI can be found in [BASE-URL]/swagger

Customization:

  • To get the Swagger at APP root directly, set the RoutePrefix property to an empty string
app.UseSwaggerUI(c =>
{
    c.SwaggerEndpoint("/swagger/v1/swagger.json", "My API V1");
    c.RoutePrefix = string.Empty;
});
  • The configuration action passed to the AddSwaggerGen method adds information such as the author, license, and description
services.AddSwaggerGen(c =>
{
    c.SwaggerDoc("v1", new Info
    {
        Version = "v1",
        Title = "ToDo API",
        Description = "A simple example ASP.NET Core Web API",
        TermsOfService = "None",
        Contact = new Contact
        {
            Name = "Contact name",
            Email = "Test@test.com",
            Url = "Web site URL"
        },
        License = new License
        {
            Name = "Use under LICX",
            Url = "Licence terms page url"
        }
    });
});
  • We can show the xml comments added to the methods and properties in the Swagger UI. For that we need to enable the XML documentation File for the project.
    • Enable XML documentation for the project
      • In Visual Studio, Right-click the project in Solution Explorer and select Properties
      • Check the XML documentation file box under the Output section of the Build tab
                     Note: If you are using Visual Studio Code, add the following in .csproj file

  bin\Debug\$(TargetFramework)\$(MSBuildProjectName).xml
 
    • Configure in ConfigureServices
public void ConfigureServices(IServiceCollection services)
{
    services.AddDbContext(opt => opt.UseInMemoryDatabase("TodoList"));
    services.AddMvc();

    // Register the Swagger generator, defining one or more Swagger documents
    services.AddSwaggerGen(c =>
    {
        c.SwaggerDoc("v1", new Info { Title = "My API", Version = "v1" });
  
  // Set the comments path for the Swagger JSON and UI.
        var xmlFile = $"{Assembly.GetEntryAssembly().GetName().Name}.xml";
        var xmlPath = Path.Combine(AppContext.BaseDirectory, xmlFile);
        c.IncludeXmlComments(xmlPath);
    });
}

Happy Coding 😊
You can find more from here and here